Follow Us


© Copyright 2026 ArcTouch. All rights reserved.
© Copyright 2026 ArcTouch. All rights reserved.
ArcTouch shares 7 best practices for Alexa skill development used by our developers to create custom Alexa skills.
5 min. read - March 30, 2022
Get our newsletter in your inbox.
ArcTouch shares 12 best practices that provide a great starting point for building accessible web experiences.
The ArcTouch design and development team shares how to use AI to build lovable apps and websites — better and faster.
We help companies of all sizes build lovable apps, websites, and connected experiences.
I recently had the opportunity to develop a streaming music service Alexa Skill for an ArcTouch client. As we explain in this post about how to build an Alexa Skill, it’s easier than ever to build a voice app. However, as you add layers of complexity, it becomes increasingly important to follow some best practices for Alexa skill development.
Here are 7 best practices that Alexa Skill developers should apply when building their next voice app. These Alexa skill development best practices are based on a combination of external research and learnings from our client projects. And we’re happy to share these so that fellow Alexa developers can learn from ArcTouch’s experience.
The programming languages used for an Alexa Skill backend are Java, Python, and JavaScript (Node.js). There are Alexa Skill SDKs for all of them. Being a web engineer, I chose the Node.js SDK, which allowed me to use TypeScript and have all the benefits of static type-checking, Visual Studio Code’s IntelliSense (my IDE of choice), and the latest ECMAScript features.
In our project, the backend code was hosted in an AWS lambda function, which supports Node.js and code written in JavaScript. Since our decision was to use TypeScript, a few steps were required to make the backend work correctly.
To start using TypeScript, first import your project code, including the Lambda function and Skill code, into your local editor so it can be transpiled using npm commands. I use VSCode with ASK CLI. If you haven’t done it yet, install and configure ASK CLI.
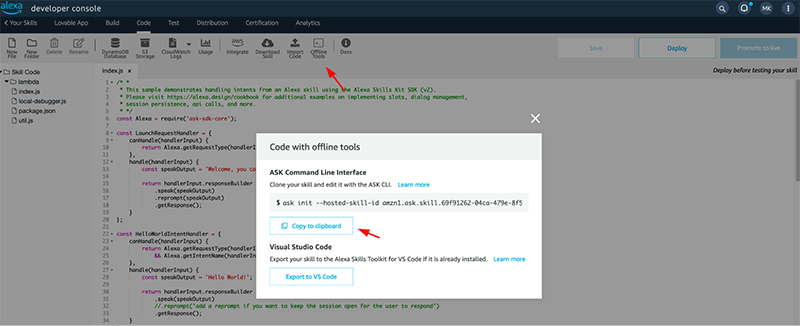
Go to the Amazon Developer Console web editor and click on Offline Tools. Copy the command line and paste it into your command prompt. This will initialize the Skill locally on your computer.
Now, you’ll have the Lambda folder with a NodeJS package, from which you can install dependencies and setup scripts, as with any other project.
Also, it’s a good idea to initialize the root Alexa Skill directory with a NodeJS package. That way we can create some command shortcuts to expedite development. Keep in mind that the project structure is like many other NodeJS projects — you can install dependencies and setup scripts as needed. The command can be seen below.
1
Now, we will need to install TypeScript dependencies in the Lambda folder, and run the following:
1
2
Make sure to create a tsconfig.json file in there as well, like this:
1
2
3
4
5
6
7
8
9
10
11
12
13
14
Notice that I have defined an outDir named dist, the Lambda function will be running in that folder. Now, create a src folder with an index.tsfile with the same content from index.js. It will be your new entry point to the Alexa Skill handler. Fix any warnings and errors in the file due to the new language.
Since you can’t change an Alexa-hosted Skill entry point, you have to replace the index.js code in a way it actually points to the compiled code:
1
2
In order to compile your code, add this script command inside Lambda’s package.json:
1
2
3
And to make your life easier, add a shortcut to compile and run on the root’s package.json:
1
2
3
Moving forward, you’ll be deploying your code by committing your changes and git pushing them.
Some Alexa Skill sample code will have the following implementation to check if a request or intent is handled by a given method:
1
2
3
4
5
6
7
8
9
10
11
12
13
14
There’s a cleaner way of doing it using two ask-sdk-core functions:
1
2
3
4
5
6
7
8
9
10
11
12
13
14
15
16
17
18
19
20
21
22
23
Additionally, you can further abstract these helper functions to a new module and call them for other handlers:
1
2
3
4
5
6
7
8
9
10
11
12
The standard Alexa Skill handler files can become quite long. While long code files work, it’s nice to have a file structure to organize each module. I recommend using errors, handlers, interceptors, requests, and utilities folders in the project. Here’s how I structured my Alexa Skill development project:
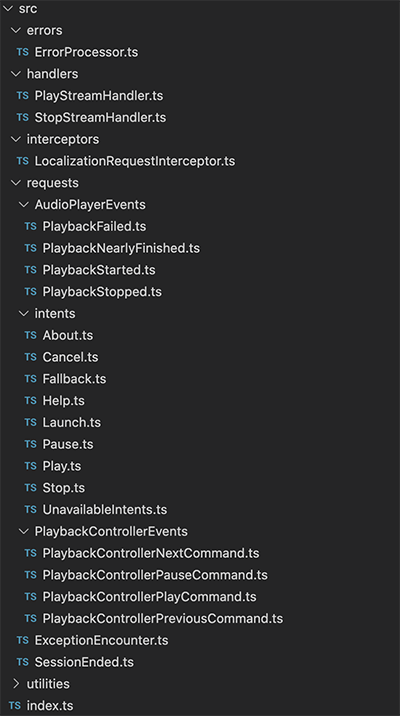
You will see two files:
The main index.ts file exposes all the handlers.
Play.ts shows how intents are handled through the canHandle method to trigger its handle method. To avoid having duplicate code, I reused src/handlers/PlayStreamHandler.ts in both the Play and Launch intent files:
1
2
3
4
5
6
7
8
9
10
11
12
13
14
15
16
17
18
19
20
21
22
23
24
25
26
27
28
29
30
31
32
33
34
35
36
37
38
39
40
41
42
43
44
45
46
47
48
49
1
2
3
4
5
6
7
8
9
10
11
12
13
14
15
16
17
18
19
Even if you’re delivering your work for a single locale at first, it’s good practice to prepare your code for localization (L10n) and internationalization (i18n). As a bonus, this also helps centralize all speech text responses in a single file, so it becomes easier to maintain:
1
2
3
4
5
6
7
8
9
10
11
12
13
14
15
16
17
18
19
20
21
22
23
24
25
26
27
28
To do this, use a LocalizationRequestInterceptor with the open-source i18next library. This demo project from Xavier Edo is a great example of how to implement this feature.
One requirement in my project was to make changing the music metadata easier without having to make a new deployment and rollout due to tweaks in the metadata. I didn’t want to create a complex database for this. The best solution I found was using AWS SDK and S3 to create and retrieve a private JSON configuration file from an encrypted bucket.
This Alexa Skill demo project, which included a Query and S3 bucket using SQL, helped me understand how I could implement this solution.
The Alexa Skills Developer Console and simulator is great, but it requires a deployment every time you want to test something. It also does not support the Audio Player interface, which was needed for this custom streaming music Skill.
Here’s where ASK CLI helps. It allows you to customize the lambda function code on the fly and supports local testing with ask run and ask dialog. You can even apply test-driven development here by creating replay files and re-running the same set of inputs whenever a handler is modified. This way, you don’t have to manually invoke each utterance to test the Skill experience.
One caveat: Since I was building an audio streaming Skill, ideally I would have liked to perform automated tests in the audio streaming feature by leveraging the replay files mentioned above. Unfortunately, that’s not possible. Since there is an audio stream being played, your Terminal window will not be able to play it. So, you’ll need to at least have access to the Alexa mobile app, which does offer support for audio streams, even with Skills under development. My recommendation is to have an Echo device with a screen to make sure that the overall user experience is working well — particularly if you want to verify the metadata displaying for each audio file.
To access your Skill through those devices with the same Amazon Developer account, sign in to the Alexa mobile app and confirm the Skill is showing in More > Skill & Games > Your Skills > Dev. Then invoke your Skill with a supported command either in the Alexa app or through the device.
I built custom CI/CD pipelines to automate the process of transpiling the code and deploying the Skill for the QA engineers in a development environment. I also used those pipelines as a production environment for submission to the Alexa Skills store.
The ASK CLI does not offer out-of-the-box support for multiple environments and configurations. So, I had to parameterize some files and create an additional ASK CLI profile that’s considered the default one. Here’s how:
The file is located inside the folder .ask and is called ask-states.json.
The JSON object has a list named profiles. If you are using the default configurations, you should have a key named default. Copy the key and its value and add it as a new item within the profiles list. Change the new key from default to __ENVIRONMENT_ASK_PROFILE__. This will allow your pipelines ASK CLI credentials to pick up the information within this profile to make the deployment of the Skill and associated lambda function.
In the newly created profile, there are three keys named SkillId, arn, and iamRole. They need to be updated before ASK CLI can deploy your code. I added tokenized values that I replaced with the correct values based on my pipeline environment — development and production.
The file, located in the root folder, is named ask-resources.json.
This JSON object is similar to the one in the ask-states.json file. Duplicate the default key and its value in the “profiles” list and change the key once again from default to __ENVIRONMENT_ASK_PROFILE__.
This file, located inside the folder skill-package, is named Skill.json.
The JSON object has a key named uri, which is the arnID associated with the Lambda function. Since I had two environments, I also had to replace the value of it based on the environment. I added yet another pipeline task that set the appropriate value.
After this update, I was ready to deploy my Alexa Skill and the supporting Lambda function to all my environments.
We hope you found these best practices for Alexa Skill development useful. Contact us if you need advice or help with an Alexa Skill development project.
