Follow Us


© Copyright 2026 ArcTouch. All rights reserved.
© Copyright 2026 ArcTouch. All rights reserved.
Learn how to migrate a Xamarin.Forms app to .NET MAUI with this tutorial from the Xamarin developers at ArcTouch.
5 min. read - September 29, 2021
Get our newsletter in your inbox.
ArcTouch shares 12 best practices that provide a great starting point for building accessible web experiences.
The ArcTouch design and development team shares how to use AI to build lovable apps and websites — better and faster.
We help companies of all sizes build lovable apps, websites, and connected experiences.
Microsoft’s .NET Multi-platform App UI (MAUI) is just a few months away from launch. Given our experience as top Xamarin app developers, we’re eager to better understand what .NET MAUI means to Xamarin development. One of the first questions we want to answer: How do you migrate apps built with Xamarin.Forms to .NET MAUI?
Microsoft plans to provide a .NET Upgrade Assistant tool to help you migrate your Xamarin app to MAUI — once MAUI is fully ready for commercial use (expected in early 2022). In the meantime, the company cautions against migrating any production apps to .NET MAUI:

Although we respect warnings, as Xamarin pioneers we couldn’t wait to migrate an app to MAUI. We picked an internal app built using Xamarin.Forms several years ago. The app, called iHaveIt, helps our QA team manage our extensive test library of mobile and IoT devices.
In this post, we explain how to manually migrate a Xamarin.Forms app to .NET MAUI. We cover some things we learned and factors that developers should consider as they prepare to migrate their own apps. We used .NET MAUI preview 7 and expect that some of what we found is bound to change leading up to the official release. We’ll do our best to update this post as information changes.
Any successful app project starts with a good plan — and some research. That also means understanding what Xamarin is and where it’s headed.
The focus of this article is how to migrate apps developed with Xamarin.Forms to .NET MAUI. If you have an application made with Xamarin Native, you may wonder what MAUI means for you. To start, read our blog post comparing Xamarin.Forms to Xamarin.Native.
Xamarin Native applications are built in a similar way as native iOS and Android applications (with Swift and Kotlin). MAUI provides a layer of abstraction that communicates with each native platform. However, by using Xamarin.Android/iOS your app already communicates directly with your chosen platform. So, if you did develop an app with Xamarin Native, you probably don’t need to migrate it to MAUI. You’ll only need to update it to .NET 6.
However, if you do want to move your Xamarin Native app to .NET MAUI, you’ll have to move the native UI to either Xamarin.Forms XAML first, and then to .NET MAUI, or to .NET MAUI XAML right away. That’s a whole different process.
For those who want to learn how to migrate Xamarin.Forms apps to MAUI, you’re in the right place. Read on.
Applications commonly have a large number of external dependencies. These dependencies can affect your project and increase the time that you spend migrating it. Before you start, review all your app’s third-party libraries and check how they are integrated.
Search nuget.org to see if the plugin has been updated and supports .NET 6 and .NET MAUI. Check for issues on each library’s GitHub home and verify if the developer maintaining the library plans to migrate it to .NET MAUI — or if the open-source community is discussing that. I tried to migrate some plugins without searching for library updates and the results were far from successful.
If any of your plugins won’t receive support for .NET 6 and .NET MAUI, it’s time to look for alternatives. Here are three approaches you can take:
Find a replacement plugin: Consider changing your out-of-date plugin and replacing it with a new alternative. The best place to look for a replacement is on nuget.org.
Build your own plugin: This can be the hardest alternative but will result in independence. Building (and maintaining) your plugin only makes sense if it’s quick or you don’t have time restrictions to finish the process.
Temporarily disable your plugin: If you can’t find an alternative plugin and writing your own isn’t an option, your last option is to disable the incompatible plugin and comment out code that refers to it. For example, let’s say that your log service is incompatible with .NET 6 and .NET MAUI. Therefore, it blocks the migration — until you disable it. Use this option with caution and a full understanding of the impact on the user experience. In most cases, it’s not a good idea to remove functionality — even temporarily.
If none of the above are possible options for your application, you may need to wait for updates to your plugins and/or updated versions of .NET MAUI.
Now it’s time to check for any obsolete APIs that your application still uses. As .NET MAUI is an upgrade of Xamarin.Forms, some APIs are going to be deprecated. Make sure you are not using Xamarin.Forms.DataPages or Xamarin.Forms.Themes packages. Xamarin Forms 5.0 removed them.
Our iHaveIt app doesn’t have too many dependencies. We used the Manage NuGet Packages functionality to search for the three plugins and updated them to their latest stable versions. Xamarin.Forms was the most important of them. Our app was running on top of Xamarin.Forms version 4.4.0. We updated it to version 5.0.0. With Xamarin.Forms version 5.0, a few APIs were deprecated and some experimental features moved into a community-backed plugin called XamarinCommunityToolkit.
Unfortunately, we had one more migration blocker. For the sake of this test, I had to remove one of the iHaveIt app’s main features: a scanning feature that helps us easily check out devices from our library. Once the scanning plugin was disabled, our app was ready for migration.
To set up the Xamarin.Forms migration, I followed the steps that Microsoft recommends here. First, I created a new .NET MAUI application with this command in the terminal.
1
Next, I moved all the files from the Xamarin.Forms project to the newly created project. That wasn’t super challenging, but it was laborious.
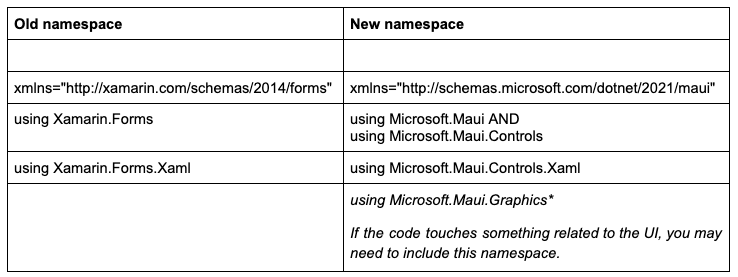
I changed all the old namespaces to the new ones used by MAUI. No mysteries, just a Find and Replace command on your preferred text editor to do the job. Here are the namespaces changes I made on C# and XAML files:
The best way to complete this is with small steps. I started with isolated parts of the project — then moved forward to parts with more dependencies. In my case, I had a few services and converter classes that could be easily updated without build errors.
After replacing all these values, I ran the project just to certify it was working. Think of this as a checkpoint: Each successful build is confirmation we are heading down the right path. It also gives us a time to rest and take a breath before moving on to the next checkpoint.
I’m a Mac user and during my time through this process, I wasn’t able to use features from the new Visual Studio 2022 preview, including creating a .NET MAUI project and running it from the IDE (without needing to use the terminal). Also, I used Visual Studio for Mac which does not support .NET MAUI yet — and works as a mere text editor. If you prefer a lighter alternative, you can use Visual Studio Code or any text editor of your choice. Then, just like me, the terminal can be your best friend to build and run the application.
The build command differs depending on the app platform you’re targeting. You should run these for Android and iOS, respectively:
1
2
Running these commands will build and run the app on the already open simulator/emulator. Having made these changes explained above, our iHaveIt app was built and ran gracefully.
In this step, I reviewed the whole app, checking each screen to verify the behavior was as expected. Since I’m dealing with pre-release code, changes may be required to fix any unexpected behavior. As one example, I experienced this known bug relating to image size.
Watch for any updates on the layouts and controls as they may result in unexpected bugs. For example, the Xamarin.Forms RelativeLayout layout class won’t make it to .NET MAUI. We recommend removing this layout from all apps because even for your current Xamarin.Forms application, its performance is poor. However, if you still want to continue with it, add a reference to the compatibility namespace as shown here:
1
2
3
Another area to pay attention to is the StackLayout and Grid spacing values. With .NET MAUI, these layouts had their default values for spacing changed to zero. During my check, I was looking for items being cut or overlapped by others. I didn’t have this issue. If it happens to you, you can fix the layout by adding a resource to include the old value, as shown here:
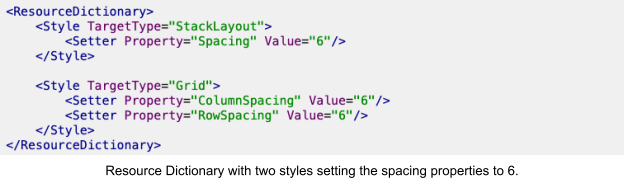
SOURCE: Announcing .NET MAUI Preview 7
After verifying the layouts, it was time to focus on a new part and bring back all the mechanisms that help us to compose our pages. I’m talking about Triggers, Behaviors, Converters, Effects, and Custom Renderers.
The good news: After changing the namespaces I didn’t need to make any other changes to Triggers, Behaviors, and Converters. These elements are often used in Xamarin.Forms apps. and I was able to bring this functionality back without any extra effort.
To better understand the next step, it’s useful to have a little context about the Startup file.
If you are an experienced backend developer, you may be familiar with the Startup file. It follows a similar approach to the ASP.NET Core approach. However, with .NET 5, we can use .NET Generic Host in other types of .NET applications.
You can use Startup.cs to centralize all your app’s resources into one single file. It is placed where you keep your services, fonts, handlers, renderers, and third-party libraries. It also defines your app’s initial screen.
This file serves as the starting point for configuring the .NET MAUI application. This is how it would look at this stage:
1
2
3
4
5
6
7
8
9
10
11
Next, let’s take a look at how to configure effects and custom renderers. Given that we fixed the namespaces during Step 2, we now need to register them in the .NET MAUI application Startup.cs class.
I decided to register my legacy renderer instead of porting it to the new handlers structure. To achieve this, I used the ConfigureMauiHandlers method. Inside its body, I applied the AddCompatibilityRenderer handler to register all Xamarin.Forms custom renderers to my .NET MAUI project. Here’s what that code looks like.
1
2
3
4
5
6
7
8
Since .NET MAUI offers a single project experience, I needed to decorate my code with #if preprocessor directives to only register iOS Renderers when running the iOS project.
The same was true for Effects. The difference is the way Effects are registered from Xamarin.Forms to .NET MAUI. I used the ConfigureEffects method and added all Effects using the Add method. Like this:
1
2
3
4
In Xamarin.Forms, both Effects and Custom Renderers are usually registered using assembly attributes. That’s not the case for .NET MAUI, so I needed to remove them all from our code. And don’t forget (as I did — oops) to remove any [assembly: …] decorations related to Custom Renderer and Effects registration. Assembly scanning has a heavy cost to the app, so removing it should streamline your app’s performance. Here is a sample of it with that part removed:
1
2
3
4
5
6
7
8
9
10
11
12
13
14
15
16
17
18
19
Although not mandatory to change when migrating Xamarin.Forms apps to .NET MAUI, it’s important to touch on Handlers and Dependency Injection.
You can save some time by porting your Custom Renderers to the new Handlers structure. It brings benefits to your app, such as a simplified and decoupled structure, easier access to the native platform, and better performance. It also modernizes your code to match .NET MAUI.
This sample shows how to use the handler structure to change the native behavior of any controls. Place it in the cross-platform layer. This approach supersedes the registration of legacy Custom Renderers or Effects.
1
2
3
4
5
6
7
8
9
For comparison purposes, see the code above in the old fashion (Xamarin.Forms) below.
1
2
3
4
5
6
7
8
9
10
11
12
13
14
15
Although commonly used, our app didn’t use Dependency Injection. If you’re a fan of using Dependency Injection in your apps, you should know that it comes by default with .NET MAUI. The usage is very similar to what we did in the Startup.cs file to configure Fonts and Custom Renderers. Use the method ConfigureServices to map the abstractions to the implementations, like this:
1
2
3
4
After updating our files and verifying our screens, we had one last step. We already know that a .NET MAUI app consists of a single project and you may be wondering how you will reconcile the native platform differences. The old Xamarin.Forms way of having one project per platform is still available, and it’s not mandatory to work with a single project.
However, I wanted to go with the single project approach. Here’s what needs to change on the .csproj file.
Currently, Icons, SplashScreen, and Fonts are configured in each platform project in Xamarin.Forms. That’s because they currently require specific folders, different sizes, and even native implementation (like for Splash screens). MAUI streamlines the configuration of them into a single project file (.csproj) as shown below.
1
2
3
4
5
6
7
8
9
10
11
12
13
With a few adjustments, I configured our application resources again. Next, I registered the custom font we use in the new format. Remember to remove the [assembly: ExportFont(…)] decoration attribute:
Remove:
1
Add to Startup.cs Configure method:
1
2
3
4
In a typical Xamarin.Forms application, the app name, app version, and app identifier are usually also set per platform. On .NET MAUI, these settings are configured in the project file. Here’s how it looks in our app:
1
2
3
4
5
6
7
8
If you are familiar with Flutter development, you are aware of pubspec.yaml file. It’s pretty much the same idea with .NET MAUI. It’s just one file that we will use to specify all dependencies related to our project. It can be the items listed above — and also packages and folders, among others.
After following the steps above I migrated our Xamarin.Forms app to .NET MAUI. Although I had to remove a scanning plugin and had some small UI troubles, I consider it a success. Given that I am using a pre-release version of MAUI, I expect that things will improve with each subsequent version.
Below you can see the before and after screenshots: The Xamarin.Forms app is on the left, and the migrated app on .NET MAUI app is on the right.

Here are a few important takeaways for Xamarin developers based on our experiences.
While it’s technically possible to migrate your apps today, don’t do it. Microsoft releases previews of .NET MAUI every month and the stable release should come in early 2022. We recommend learning the framework and understanding its structure. Keep an eye on .NET MAUI GitHub repository, as well as on the .NET blog, for updates. Since migration is not yet advised, start researching the plugins used in your app and their support for .NET 6 and .NET MAUI. This should give you a jump on finding any alternatives if needed. Better safe than sorry.
If you experiment and successfully migrate your Xamarin.Forms app to .NET MAUI, make sure you update the MAUI project to the new previews as soon as they are available. You’ll be able to see new changes and bugs fixed. If structures change, you’ll see them more clearly since you already got rid of some issues during the prior migration attempt.
And if it was not possible to migrate your app during the first attempt, try the process again with the new releases and see if anything changes.
Each time you try you’ll become more familiar with .NET MAUI, and better understand the changes required for your future production .NET MAUI app.
Even if you checked every dependency and feel confident your Xamarin.Forms app will migrate smoothly to .NET MAUI, we strongly recommend doing it in small steps. Start with isolated parts of your app system, especially if your app code is complex. Can you migrate a single screen and have a working app? Good, then migrate another one. This way, you can expect to see a much lower number of errors than if you were running the process for the whole app, and any build errors you do get are more clear.
ArcTouch’s cross-platform developers are experts in Xamarin, Flutter, and React. Contact us to learn more about how cross-platform app development can accelerate your time to market, and reduce your development and maintenance costs.
