How We Used Apple WatchKit + HomeKit to Control Lights
As one of our 2015 Hackathon projects, one team built a hack with Apple WatchKit and HomeKit to control the Philips Hue Connected Light.
5 min. read - January 22, 2015
Since Apple’s WWDC ’14, we’ve been excited about the new tools available for developers to build entirely new experiences with the Internet of Things (IoT) — well beyond what a typical phone or tablet are capable of. I’m particularly interested in the promise of Apple WatchKit and HomeKit.
So, late last year when our executive team announced the ArcTouch Hackathon would take place during the first two business days of 2015, senior developer André Gatti and I thought it would be pretty cool to hack a way to control a home lighting system using an Apple Watch.
Of course, HomeKit devices haven’t yet hit the market (though several were announced at CES) and Apple Watch isn’t due out until later this spring. But that doesn’t mean we couldn’t start playing with our new dev toys tools.
Over the course of two days (January 5th to 6th), we hacked a way to control a Philips Hue Connected Light using Apple’s WatchKit extension in combination with HomeKit. Here’s how we did it:
STEP BY STEP: Controlling Lighting with Apple HomeKit + Apple WatchKit
Step 1: Research and planning
ArcTouch began planning for our hackathon in November, and after we were given the green light for our project in early December, we started researching a solution immediately.
The first step was to find an Apple HomeKit enabled device on the market. The answer: There was none.
Without a device on the market, we decided to build a bridge between HomeKit and other commercial accessories.
We knew AppleWatch wasn’t going to be available for a while, but determined we could use Apple’s Watch Simulator, running on another device as a proxy.
We purchased the Philips Hue Connected Light.
With all building blocks in hand, we spent a few days during the holidays figuring out the basic concepts behind each technology and trying to anticipate any potential blockers that may arise during the hackathon.
Step 2: Hackathon – Two days of coding chaos
New Year came and the hackathon was underway. With only two of us on the project, we split tasks into three major activities: The watch interface design, Apple HomeKit bridge tweaking and the WatchKit + HomeKit integration.
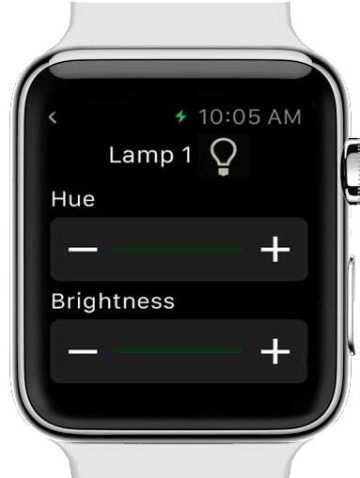
Developing the watch interface: In two days, I was responsible for designing and coding the Apple Watch app user interface and controls, the WatchKit app extension, and the interface between the extension and the iPhone app to control the demo. I used Apple Swift for a lot of this coding, which while incredibly simple is still a new language I’m getting to know. All in all, there were no major roadblocks here — just a lot of code that was written.
Building the HomeKit bridge: The process of making the bridge between HomeKit and the Philips lights work in our environment figured to be a fairly straightforward for André. But just as we were getting started, we unexpectedly had a hard time connecting the Philips hub to the Internet. It turned out to be an IP address issue we fixed easily with some new code — but it cost us a couple hours of time to identify the problem. And in a two-day hackathon, time is precious. Fortunately, we were able to save a little time when we found some code on GitHub that gave us a head start on the bridge itself.
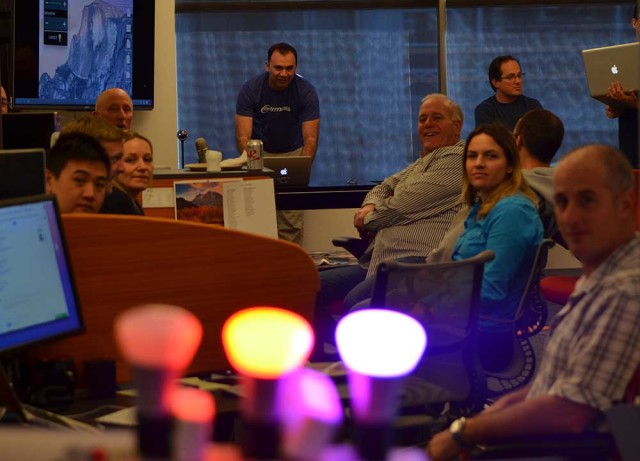
Enabling the Philips Hue Connected Light Control: First things first, we had to put the lights in a place that was visible — so Andre mounted it atop one of the dividers between our workstations. The next step was to configure the bridge to make sure it was able to pass simple commands from the WatchKit extension, via an iPhone app, to the light system. Then André created some basic commands that allowed us to turn the lamps on/off, and control hue, saturation and brightness. He also set up one pre-defined scene we called “Deep Sea” — a combination of blue and red hues.
Step 3: Victory!
There’s nothing better than the moment when something you thought you could make work actually does work as expected. This occurred for the first time on Tuesday afternoon — as Day 2 of our hackathon was winding down. Even better was the next day, the noon hour, when I stepped in front of a group of people gathered in our San Francisco office while a team in our Brazil office watched live on video. From a table at the front of our office, I fired up the WatchKit extension on my MacBook — and as people turned to look at our lighting display, it responded to my commands to turn it on, off, change hues and set to Deep Sea scene. Exactly as planned.
Step 4: Post-mortem on what we learned
The two-day hackathon went by in a blur. Looking back, here’s what we learned:
Developing for the IoT is much different than developing for phones and tablets — and from a developer’s perspective, that’s a welcome change. The fun is just beginning.
With some good design, the Apple Watch can in fact be used as a controller.
You can never assume network connections for different devices are going to work as expected.
Hackathons are a great way to prove concepts and test new ideas, which may plant the seeds for new projects.
In two days, you can build a working prototype — but it’s near impossible to write clean code that you are proud of. It will need some beautifying.
Article Author:
Subscribe for more insights
Get our newsletter in your inbox.
Related posts
12 web accessibility best practices: A starter list
ArcTouch shares 12 best practices that provide a great starting point for building accessible web experiences.
Injecting AI into software development — an ArcTouch blog series
The ArcTouch design and development team shares how to use AI to build lovable apps and websites — better and faster.

Contact us.
Let's build something lovable. Together.
We help companies of all sizes build lovable apps, websites, and connected experiences.


