Follow Us


© Copyright 2026 ArcTouch. All rights reserved.
© Copyright 2026 ArcTouch. All rights reserved.
ArcTouch’s development team provides a step-by-step guide for how to build a custom Instagram Filter using Spark AR from Meta.
5 min. read - March 23, 2023
Get our newsletter in your inbox.
ArcTouch shares 12 best practices that provide a great starting point for building accessible web experiences.
The ArcTouch design and development team shares how to use AI to build lovable apps and websites — better and faster.
We help companies of all sizes build lovable apps, websites, and connected experiences.
Have you ever imagined pointing your phone’s camera at a museum exhibit and seeing information bubbles about it appear on your screen? Or recording yourself on Instagram with sharp fangs and red eyes like a vampire? Or playing a simple game where you try to capture food falling from the sky? You can create these kinds of augmented reality experiences with Spark AR from Meta.
Spark AR is an augmented reality technology that lets you create immersive experiences for users. ArcTouch has been recognized by Meta as a Spark AR Certified Company. We’re very excited about AR experiences, and how brands and businesses can use them in creative ways to connect with their customers.
This post includes step-by-step directions on how to create an Instagram filter using Spark AR. Let’s jump in and create our first AR experience with 3D objects, animations, and user interactions.
The final result of our Instagram filter
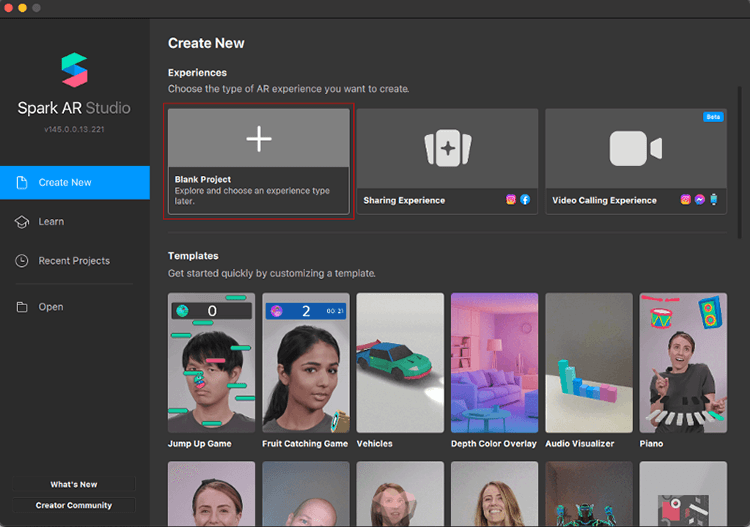
If you haven’t already done so, download Spark AR. Meta provides a tutorial to get familiar with the interface. Spark offers a wide range of templates to start, ranging from makeup to complex image processing. We’ll start with a blank project, like this:
This tutorial creates an object over the user’s head. First, add an object to the project. You can use any 3D object you have, or pick one from the Spark AR Library (such as the Cylinder Primitive). For this article, I used a bottle of the ArcTouch Secret Sauce. Name your 3D object secret_sauce.
Click the plus sign at the bottom left of the screen, choose Import > From Computer, and select your 3D object (or skip if you imported a 3D asset from the Spark AR Library):
Next, add the Eye Color block (so the Instagram filter can change the user’s eye color). Click the plus sign again and select Search AR Library. On the menu, click Blocks and search for “eye color.” Choose the Eye Color block.
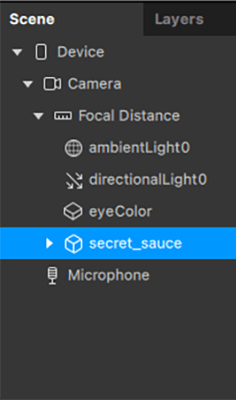
Your project structure should look like this:
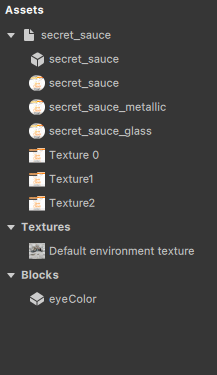
Now that the assets are in the Spark AR project, you can start building the effect.
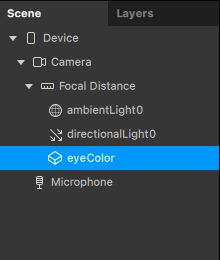
The first step is to customize the user’s eye color. Drag and drop the eyeColor block under the Focal Distance item in the Scene tab:
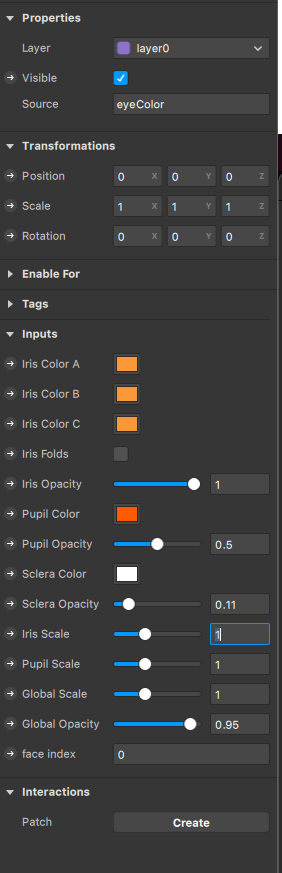
The eyeColor block has properties to customize. We’ll use the orange from ArcTouch’s logo as the primary color of the eye, so change the Iris Colors A, B, and C to #FB983A and the Pupil Color to #FF5A00. Set the Iris Opacity to 1, the Sclera Color to #FFFFFF, and the Sclera Opacity to 0.11. You can experiment with those values to see what works best for you. I also unchecked the Iris Folds checkbox to create a better effect:
Next, add the Secret Sauce Bottle to the scene. Drag and drop it into the Scene:
The Secret Sauce bottle we added to the Scene is static — it does not interact with the user. Let’s enhance this by making it float above the user’s head and follow it by adding a Spark AR Face Tracker. This lets you track the user’s face around the Scene. On the Scene tab, click on the plus sign and Face Tracker:
To make the bottle follow the user’s head, connect the Face Tracker with the Secret Sauce bottle. Use the Spark AR Patch Editor, which lets you create interactions and animations without writing code. Instead connect the inputs and outputs of various “patches” together to change the size, shape, color, and location of items in your scene. Go to the top left of your screen and click WorkSpace > Show Patch Editor. This should open a tab at the bottom of your screen.
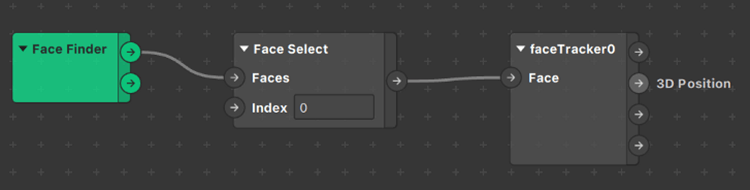
Select the Face Tracker from the Scene menu and then click the right-side menu on Interactions > Create > Producer Patch. This adds three connected patches to your Patch Editor.
Select your 3D object in the Scene tab and click the Arrow next to the position property. It should turn yellow when you hover your mouse over it. By doing this, you will be able to set up the position values of your object through the Patch Editor.
In the Patch Editor, click on the 3D Position output of the faceTracker0 patch and connect it to your 3D object input, and it will start following the user’s head:

Now the bottle is following the user’s head, but it’s not placed correctly. You can move it up with the help of three patches: Unpack, Add, and Pack. Add patches by right-clicking in the Patch Editor and then typing or selecting the one you want.
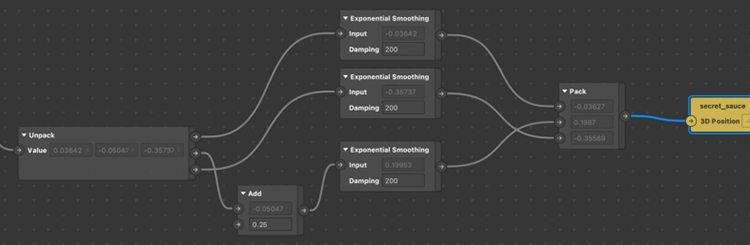
Unpack receives an input vector signal and unpacks it, letting you work individually with each output. Add adds a value to a value, and Pack packs inputs into one output. Connect the 3D position output of the faceTracker patch to the input of the Unpack patch, then connect the first and third outputs (x and z values) to the first and third inputs of the Pack patch. Connect the Y output of the Unpack patch to the Add patch’s input and connect the Add patch’s output to the Pack patch’s second input. At the Add patch, on the second field, use the value 0.25 to move the bottle slightly above the user’s head. Finally, connect the output of the Pack patch to the input of the 3D object.
Pro tip: If you want to smooth the object’s movement, add three Exponential Smoothing patches to the Patch Editor. Connect the first and third outputs of the Unpack and the output of the Add patch to the inputs of each Exponential Smoothing patch. Connect the outputs of the Exponential Smoothing patches to the input of the Pack patch, like this:
Let’s add the animations to the Scene. First, make the bottle spin: Right-click on the bottle in the Scene menu and then choose Actions > Animate > Spin. This adds three patches to the Patch editor. Increase the Duration in the Loop Animation patch values to decrease the speed that the bottle spins. Four seconds is a good value, but you should experiment on your own to see different effects:

Next, add the pulse animation. Repeat the same steps as before and select Pulse instead of Spin. Modify the Transition patch values of the Pulse animation to start from 0 and end at 1.5.
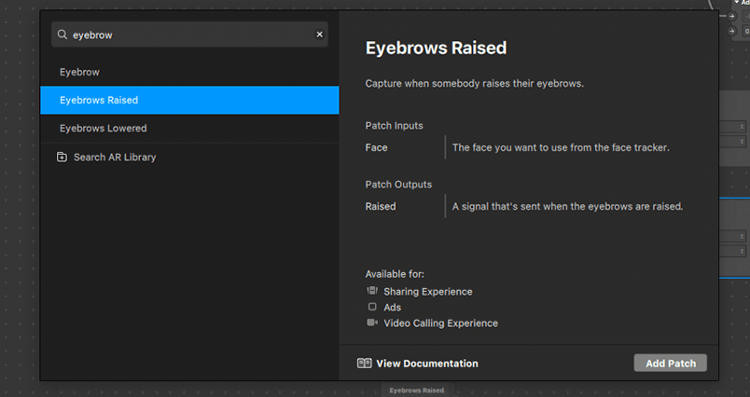
User interactions make Instagram filters more interactive. Let’s make objects appear in the Scene when the user raises their eyebrows. Right-click on the Patch editor and search for “eyebrow,” then select the Eyebrows Raised patch:
When the user raises their Eyebrows, we’ll toggle the Pulse animation so that the bottle appears on the screen and starts to rotate. The orange eyes also appear. To do this, connect the faceTracker0‘s face output to the Eyebrows Raised patch input:
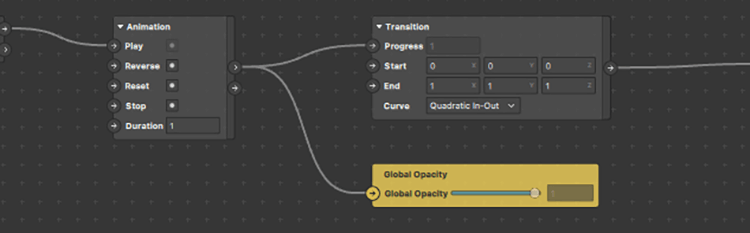
Then, remove the Loop Animation Patch from the Pulse animation and replace it with an Animation Patch. Connect the Eyebrows Raised output to the Play input of the Animation Patch. This adds a Pulse patch between them. Finally, connect its Progress output to the Progress input of the Transition Patch.
For the orange eyes, select the eyeColor block and then click on the Arrow next to the Global Opacity property to add it to the Patch Editor. Then, connect the Progress output of the Pulse animation to the input of the Global Opacity patch:
Now the bottle and the orange eyes appear in the Scene when the user raises their eyebrows.
This last step is optional but adds some fine-tuning to your Instagram filter.
First, let’s add an On/Off switch. Add a Not patch and connect it to the Eyebrows Raised’s Pulse patch, then Turn On output. This adds a Switch patch between the Pulse and the Not patch. Then, connect the Not patch output to the Animation patch’s Reverse input. This adds a Pulse patch between them. With these changes, you can turn the effect on and off.
Finally, organize and group the items in the Patch editor. Create groups by selecting patches and right-click Group. Keeping a Spark AR project well-organized is a best practice and will improve your work considerably.
This post showed how to create an Instagram filter using Spark AR. If you’d like to learn how your brand or business can connect with customers through AR experiences, contact us for a free consultation.
