How to implement iOS App Shortcuts and App Intents
Step-by-step instructions how to implement App Shortcuts and App Intents in iOS 16, explained by the ArcTouch app development team.
5 min. read - September 29, 2022
[Editor’s note: This is the first in a series of posts about implementing the new App Shortcuts and App Intents in iOS 16.]
[Updated August 6, 2024: In iOS 18, Apple is introducing a smarter Siri with Apple Intelligence, AI features that enhance the capabilities of App Intents.]
It’s Friday evening. And that delivery order of snacks and drinks for the party you are hosting tomorrow is running late. You want to check on the expected arrival time, but you’re in multitasking mode — you’re busy cooking dinner, or maybe working out, or perhaps writing that blog post about the new APIs in iOS 16.
To get the delivery update, you have to stop what you are doing, unlock your phone, launch the store’s app, find the account screen button, then tap the button that finally leads you to your order status screen. When you find your order, you might need to tap yet another button to actually see the delivery details — and why your goods haven’t arrived yet.
Fortunately, with iOS 16, this cumbersome user experience can be eliminated — and replaced with a simple voice interaction. You say, “Hey Siri, where is my order?”
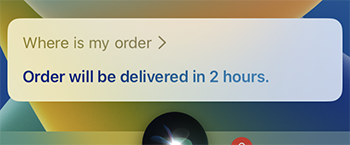
A user says “Where is my order,“ and Siri responds, “Order will be delivered in 2 hours.”
This is called an App Shortcut and in iOS 16 it no longer requires any extra in-app setup from users. It simply takes a little know-how from iOS developers to support the new App Intents framework and APIs.
App Shortcuts and App Intents
An App Intent represents an action that the user can perform in your iOS app. They are like pieces of a puzzle. They do nothing on their own, but users can create useful shortcuts with them through the Shortcuts app. App Shortcuts, on the other hand, are automatic shortcuts that app developers create for users so they don’t have to. An App Shortcut is essentially a wrapper around an App Intent; it allows the App Intent to be activated by the user as soon as your app is installed, with no additional setup.
If you’re not sure if the new App Intents and App Shortcuts make sense for your app, check out this post on iOS 16 App Intents and why you should support them.
Step-by-Step: How to implement App Shortcuts and App Intents
This is the first of three posts on how to implement App Shortcuts and the App Intents that power them. In this first post, we’ll go through three use cases that relate to the food delivery scenario above, and provide step-by-step instructions on how to add App Shortcuts and App Intents to an iOS app.
Use case 1: Check order status
First, let’s turn the hypothetical Siri conversation to check your order status into reality through an example grocery app named Lemon.
The process of creating a working App Shortcut takes at least two steps. First, we create an App Intent that represents the action to perform. Second, we build an App Shortcut to perform the action from the App Intent.
The new App Intents framework in iOS 16 is built in Swift, so that’s what we’ll use. We won’t need to change any settings in Xcode to support App Intents or create any configuration file. All we need is Swift code. This means our App Intents have a single source of truth and are easy to maintain.
Step 1: Create an App Intent
An App Intent is a very simple struct that conforms to the AppIntent protocol. We want to create an App Intent that can be used to check the current status of our latest order, so we’ll call it OrderStatusIntent. This is what our App Intent looks like:
1
2
3
4
5
6
7
8
9
10
11
At a minimum, an App Intent has a title and a perform method. The title is a short, human-readable string that describes the intent, usually in the form of a verb + noun. We’ll call our App Intent “Check Order Status.” Note how the title is not a plain String, but a LocalizedStringResource instead. If your app supports multiple languages, the LocalizedStringResource will be a key to the localized string. The system will not look up the translation immediately but will save this key and look it up later when it needs to perform the localization.
The perform method does the actual work when the intent is executed. It’s an asynchronous method that may return a value or throw an error. When an App Intent throws an error, the user is informed the App Intent failed. In our App Intent, for simplicity purposes, we asynchronously check the latestOrderStatus property on a shared instance of ViewModel. If that property does not throw an error, it will return the status of the latest order.
Since the perform method is asynchronous, we can use it for time-consuming operations, like reading from a database or making network requests. It’s important to keep these operations as short as possible since the user is waiting for them to finish. The system will allow your app to run the perform method for a few seconds. If it doesn’t return until then, it will throw an error.
When an App Intent is executed successfully, it returns a result, which may contain different things. Depending on what the result is, we need to set an appropriate return type for our method. Our App Intent above returns a value and a dialog, so the return type is something that ReturnsValue and also ProvidesDialog. We’ll take a look at different result types later on.
An App Intent’s result value can be a number, a string, a date, or app entities, which we’ll explain later as well. The return value of our App Intent is the estimated delivery time of our order in hours. When an App Intent returns a value, that value can be used as an input for other App Intents, and users can leverage that to create custom Shortcuts. For example, a user can go to the Shortcuts app and create a custom shortcut for an estimated delivery time that triggers a timer using the Clock app.
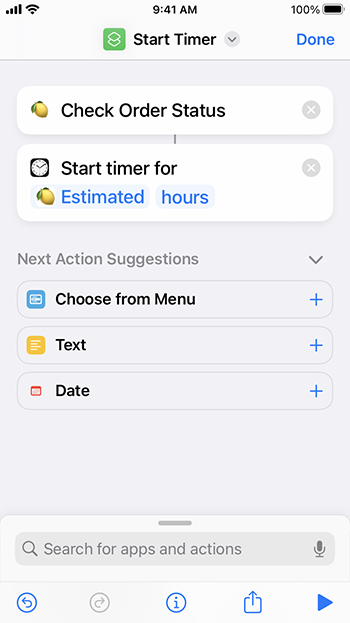
The user creates a custom shortcut in the Shortcuts app using the Order Status intent and the Clock app’s timer intent. The output from the order status, (the estimated delivery time) is used as the input for the timer.
App Intents can also return a dialog that Siri will announce. That dialog is an IntentDialog, which can be initialized with a string literal. In our App Intent example above, Siri says, “Order will be delivered in 2 hours.”
Step 2: Create an App Shortcut
Now that we have a working App Intent, we can create an App Shortcut. With the new App Shortcuts in iOS 16, users don’t need to go to the Shortcuts app and create a custom shortcut. The system does this automatically, and the App Shortcut is available as soon as an app is installed.
To create App Shortcuts, we’ll write a struct called AppShortcuts that conforms to the AppShortcutsProvider protocol:
1
2
3
4
5
6
7
8
9
10
The AppShortcuts struct needs an appShortcuts property, which returns a list of all the App Shortcuts. An App Shortcut is an instance of the AppShortcut struct. To create an instance, we need to provide two parameters: the instance of the App Intent that will be executed, and a list of phrases that can activate the App Shortcut. If your app supports multiple languages, make sure you localize these phrases as well.
The App Shortcut phrases should be short and easy to remember because the user needs to speak the exact phrase to activate the App Shortcut. Each phrase also has to contain your app name. To make it easier, you can provide the system with a list of synonyms for your app name and then use the applicationName token instead of your app name as a string literal. Doing so allows the user to activate the App Shortcut using any of your app name’s synonyms. For our App Shortcut, we’ve chosen two different phrases: “Where is my Lemon order?” and “Lemon order status.”
Use case 2: Show department
Let’s look at a slightly more complex example. Let’s say our Lemon store has a few different departments, including fresh produce, beverages, and frozen foods. We want to create an App Shortcut that allows users to navigate to a specific department in our Lemon app. To define that department, we add a parameter to our App Intent called an AppEntity.
Step 1: Create an AppEntity
The parameter we add is not a simple string or number, but an entity in the domain of our application. First, we have to define that entity, which is a struct called Department:
1
2
3
4
5
6
7
8
9
10
11
12
Our struct needs to conform to the AppEntity protocol. An AppEntity must be Identifiable, so we’ve added an identifier of type UUID. In addition to that, every department has a name and a list of products. Product is another AppEntity. We’ve also made our Department struct conform to the Hashable protocol, so that we can show lists of departments in our SwiftUI views.
An AppEntity also requires a static typeDisplayRepresentation, which provides a user-facing title for our entity type. That title will be displayed in different places, depending on how our App Intent is being used. We also need to define a displayRepresentation for every instance of Department, so we’ll use the department name.
Step 2: Create an EntityQuery
Next, we provide defaultQuery in our AppEntity. We use a struct called DepartmentQuery.
1
2
3
4
5
6
7
8
9
Our DepartmentQuery conforms to the EntityQuery protocol. An EntityQuery is used by the system to find instances of our AppEntity. So, we implement the method entities(for:), which is called by the system when it needs to find those instances. That method receives a list of identifiers and expects a list of departments in return. Our implementation has a single line of code that gets the list of all departments from our ViewModel asynchronously and filters the list to get only those departments whose ids are in the list of identifiers.
Since we want to eventually use our Department AppEntity as a parameter in an App Shortcut, our DepartmentQuery must implement the method suggestedEntities, which returns the list of all departments. The system will call this method and use the departments returned from it to create the parameterized shortcuts.
Step 3: Create an App Intent
Now that we have our AppEntity and EntityQuery ready, we can create our App Intent. We call it ShowDepartmentIntent and its title will be “Open Department.”
1
2
3
4
5
6
7
8
9
10
11
12
13
14
15
16
17
18
19
20
21
22
To launch our app, the App Intent needs to implement a static property called openAppWhenRun and set it to true.
To determine which department to open, we’ve added a department property to our struct. To configure that property as a parameter for our App Intent, we annotate the property with the @Parameter property wrapper. We create the property wrapper providing a title for our parameter, “Department,” which prompts the system to ask the user which department they want to see.
The next step is to implement the perform method, which is a bit longer in this ShowDepartmentIntent. When our App Intent is executed, we may already know what department the user intends to see, or we may not have that information yet, so we need to support both scenarios. Therefore, the perform method first checks if our department parameter is not nil. If we have a department already, that’s the one to try and open. Otherwise, we ask the user which department they want to see by requesting a disambiguation.
The App Intents framework provides three different prompts to ask users follow-up questions for App Intents. Disambiguation is one of them. We use disambiguation when we want the user to select one option from a small, fixed list of options. Ideally, the list of options should have five values or less, since Siri will read them all aloud, like when you use AirPods.
A disambiguation is triggered by calling requestDisambiguation(among:dialog:) on our department’s property wrapper, known as $department. That method expects a list of possible departments for the user to choose from, which is defined by our ViewModel. We can also provide what dialog Siri will speak to the user when requesting the disambiguation. If we don’t provide any dialog, Siri will just say, “Which one?” But here we are providing a more customized dialog, which is, “What department would you like to see?”
Now that we know exactly which department the user wants to see, we can present the UI for that particular department. We keep it simple by calling a single method on a shared instance of our ViewModel. If that succeeds, the method returns a dialog for Siri to say “Okay, opening [name] department,” and confirm that the action succeeded and the app is opening.
One other important note: Our perform method is annotated with the @MainActor wrapper. We need that to make sure our App Intent is performed on the main queue since the ViewModel’s navigate method expects it.
Step 4: Create an App Shortcut
Our App Intent now has a parameter. We can create an App Shortcut that automatically executes this new App Intent:
1
2
3
4
5
Two different phrases can be used to activate the shortcut. The first one is simply “Open Lemon department.” In this phrase, since we don’t specify which department we want, our ShowDepartmentIntent’s department parameter is not populated. When the App Intent is executed, Siri requests disambiguation from the user:
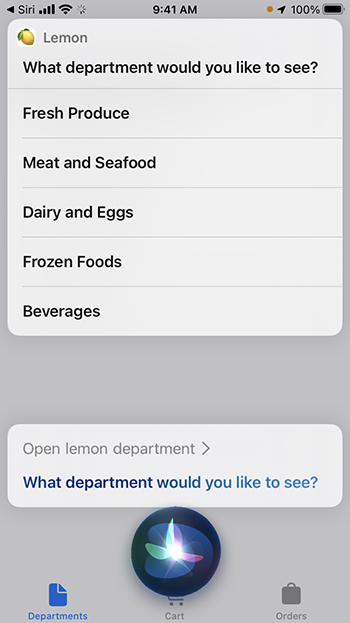
User says “Open lemon department,” and Siri responds with “What department would you like to see?,” then offers a list of department choices to disambiguate the App Intent.
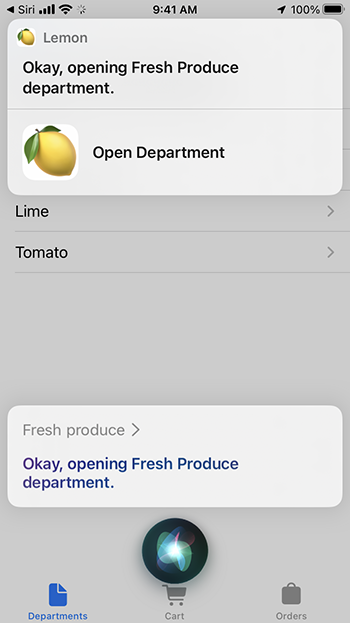
User responds with “Fresh Produce.” Siri confirms, “Okay, opening Fresh Produce department.” The Fresh Produce department screen is shown in the background with a list of products such as lime and tomato.
To deliver the best user experience, Siri interactions should be quick and to the point. Disambiguation can slow down the conversation and can frustrate users if it’s too complex. In an upcoming blog post we share more best practices for creating App Intents and App Shortcuts.
To improve this conversation, we also provide a parameterized phrase for our App Shortcut, which is the second phrase on the list. With this phrase, the user can activate our App Shortcut by telling Siri, “Open Frozen Foods on Lemon,” or “Open Beverages on Lemon.” The system populates the department property in our App Intent and avoids the disambiguation.
Step 5: Update App Shortcut parameters
Next we need to add support for updating the parameters of our App Shortcuts. The system creates a variation of our App Shortcut for each of the suggested entities we provided in our DepartmentQuery. If the list of possible parameter values in our application changes over time, we have to actively let the system know about it. That can be done with the following method call:
1
We need to call this method every time the list of possible parameters changes. In our Lemon app, we check the list of departments during app launch and we call this method if the list has changed. That recreates the available variations of our App Shortcut.
There’s one more important factor when it comes to parameters: As we mentioned earlier, the App Intents framework provides three different prompts to ask users follow-up questions. Disambiguation is one. Another is a value prompt, which is used to ask the user for an open-ended value. They are great for strings or numbers, which can take any value. Unfortunately, open-ended parameters cannot be used to create parameterized phrases for App Shortcuts. So, if our App Intent has an open-ended parameter, that parameter cannot be specified by the user in the App Shortcut initial phrase. Therefore, we have to ask for that value in a follow-up question, which is not ideal for App Shortcuts because it slows down the conversation. The third way we can ask users follow-up questions is a confirmation, which we explain next.
Use case 3: Place order
In the prior use cases we added support for users to check order status and browse departments. Now let’s add an App Intent and App Shortcut for users to place orders. For this use case, we introduce custom views.
Step 1: Create custom views
App Intent custom views, also known as snippet views, are SwiftUI views that are archived by the system and displayed in the Siri UI when the App Intent is executed. Like widgets, these views can’t contain interactivity or animations. Since they are presented together with other Siri UI components, we need to make sure our custom view feels at home in the Siri UI. For example, our views should not have an opaque background since the Siri UI has a translucent background. For the same reason, we should try using vibrant colors for our labels to guarantee great contrast against the translucent background.
Custom views are presented by the system to convey more information about the App Intent in a user-friendly way. Custom views may be presented in two different moments: before the intent is executed and after the intent is finished.
When presented before the intent is executed, a custom view may be used for either value confirmation or intent confirmation. Value confirmation happens when we guess what a particular parameter is, but we should double-check with the user to make sure we got it right. Intent confirmation, on the other hand, happens when we already have all the parameters for our App Intent, but we want to confirm the user intends to perform that action. Intent confirmation is useful for actions that may be destructive or transactional, such as placing an order.
A custom view may also be presented after the intent has finished, as one of the results from the App Intent. That may be useful when we want to provide details about the App Intent’s result in a user-friendly way.
For our App Intent, we will present two different custom views: one to confirm the user wants to place the order, called OrderPreviewView, and another to show a summary of the placed order when the App Intent has finished, called OrderConfirmationView.
1
2
3
4
5
6
7
8
9
10
11
12
13
14
15
The OrderPreviewView expects an order and uses it to display a summary of order cost and the expected delivery time/day. For simplicity, we added all the details about the order to a VStack. At compile time, the system will archive this view and save it so it can be displayed later when our App Intent is executed.
1
2
3
4
5
6
7
8
9
10
11
12
13
14
15
16
The OrderConfirmationView is similar to the first one. It also expects an order and contains a few text labels with details about the order. We kept it simple, but could also add images and icons.
Step 2: Create an App Intent
Let’s create our App Intent and use the custom views.
1
2
3
4
5
6
7
8
9
10
11
12
13
14
15
16
17
18
19
20
21
22
23
The title for our PlaceOrderIntent is “Place Order.” This time, we won’t have the openAppWhenRun property because our App Intent will not open our app. Our perform method starts by getting the order to be placed. We want to show some order information to the user and confirm they want to place the order. To do that, we call the requestConfirmation(result:confirmationActionName:) method. It’s an asynchronous method that prompts the user to confirm their intent. If the user decides to cancel the process, the method will throw an error and no order is placed.
The method expects a result as a parameter, which will be the predicted result from our App Intent if it finishes successfully. If successful, this App Intent will return the placed order, so we create a result passing the order as its value. We also provide a dialog (“Are you ready to order?”) that Siri will say to the user when asking for confirmation. Last, our result contains the intent confirmation custom view we created earlier. You may optionally provide a specific confirmationActionName, so that the confirmation button has an appropriate name for the action. In our case, the action is to place an order, so the action name is order.
If the user confirms their intent, the perform method continues executing. We then place the order and return the final result from our App Intent. This looks quite similar to the predicted result from before and also contains three elements. The value will be the order that was just placed. Siri says, “Order placed successfully.” We provide our second custom view, OrderConfirmationView, with details about the order.
Step 3: Create an App Shortcut
We create a simple App Shortcut for our PlaceOrderIntent so that users can execute it without having to author a custom shortcut:
1
2
3
4
The phrase to activate the App Shortcut is, “Place Lemon order.” The following screenshots show what the conversation with Siri looks like when the user activates this App Shortcut.
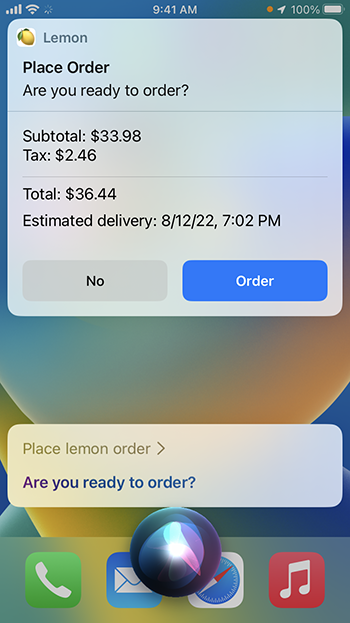
User says, “Place lemon order.” Siri responds, “Are you ready to order?” A custom view of the App Intent shows the order details. Two buttons let the user proceed with the order or cancel it.
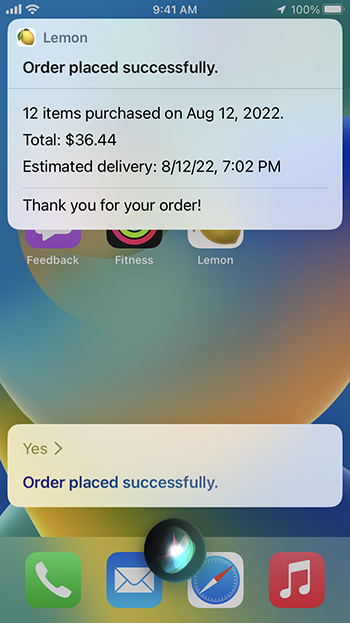
User says “Yes,” to which Siri responds, “Order placed successfully.” A custom view of the App Intent shows the order summary confirmation information.
The AppShortcuts struct with the three App Shortcuts looks like:
1
2
3
4
5
6
7
8
9
10
11
12
13
14
15
16
17
18
19
iOS now provides access to App Shortcuts in several places — Siri, the Shortcuts app, Siri Suggestions, and the home screen as widgets. In places where the system displays the App Shortcuts for our app in a list, they will be displayed in the order they appear in the AppShortcuts struct. So, we’ve sorted our App Shortcuts by our perceived importance of the use-case to the user.
Want to learn more about App Shortcuts and Intents in iOS 16?
Now you know the step-by-step instructions to implement App Shortcuts and App Intents. Of course, there are more App Shortcuts that we could create for our Lemon grocery store app. In the next post, we’ll explore how to maximize the discoverability of the App Intents in your app and take full advantage of the Siri integrations. Follow us on LinkedIn, Twitter, and Facebook to learn about new blog posts.
And if you’d like to learn how your app can leverage iOS 16’s App Shortcuts and Intents, or any of the exciting new features in iOS 16, contact us for a free consultation.
Article Author:
Subscribe for more insights
Get our newsletter in your inbox.
Related posts
Injecting AI into software development — an ArcTouch blog series
The ArcTouch design and development team shares how to use AI to build lovable apps and websites — better and faster.
5 min. read - April 9, 2024
7 best practices for creating App Shortcuts and Intents for your app
7 best practices for implementing App Shortcuts and App Intents in iOS 16 from the ArcTouch development team.
5 min. read - October 11, 2022

Contact us.
Let's build something lovable. Together.
We help companies of all sizes build lovable apps, websites, and connected experiences.