
How to integrate Sign In with Apple into your app
During Apple’s recent 2019 WWDC, one of the topics that caused a stir in the industry is the new Sign In with Apple. This single sign-on (SSO) feature is one of several new elements of iOS 13 focused on user privacy, as it will allow users to log in to apps and web sites that support Sign In with Apple using their Apple IDs, and Face ID or Touch ID biometric security.
For app developers and publishers, Sign In with Apple has the potential to be great for user experience, removing some of the friction of creating accounts, signing into accounts, and onboarding new users. But it also means that publishers won’t have access to users’ emails and names, unless the company asks for that data and a user opts-in to share it — which has the potential to limit the ability of companies to market directly to their users outside of the app experience.
Still, it’s a no-brainer to support this new feature for any iOS app that requires any kind of account sign-in. Especially if your app already supports other SSO options, such as Google or Facebook. In fact, if your app does support these other SSO options, Apple has announced that integrating Sign In with Apple is mandatory by the end of 2019.
Integrating Sign In with Apple — Step by step
In this post, we explain how to integrate Sign In with Apple into your app in nine steps.
First of all, it’s important to understand that as a developer, we should prioritize user experience above all else — including privacy. So, when we implement Sign In with Apple, we will be making it easy for users to log into our application, but ultimately allowing the user to decide whether they share their name and Apple ID email with us. The good news is that if the user does choose to opt-in to share that data with us, we can trust the email address will be valid because it is the same used for their Apple ID. We don’t need to go through any additional steps to validate the information — thank you, Apple!
Also, before you get started, you should review Apple’s Sign In with Apple human interface guidelines that need to be followed while implementing the feature. One of the main ones is that the button needs to be prominent in the screen, as Apple states, “the same size as other sign-in buttons, and avoid making people scroll to see the button.”
After enabling the feature in Xcode, developers can access a built-in button that matches Apple’s guidelines. Also, Xcode provides the action sheet where the user will grant access to the necessary information secured by Face ID or Touch ID, which now includes almost all of the devices available in the market.
Now let’s get started.
Step 1: Add Sign In with Apple to your app ID through the developer portal
First things first, you need to choose to enable Sign In with Apple through the Apple developer portal. Here’s how you do it:
- Select your App ID.
- Under Capabilities scroll down and activate Sign In with Apple.

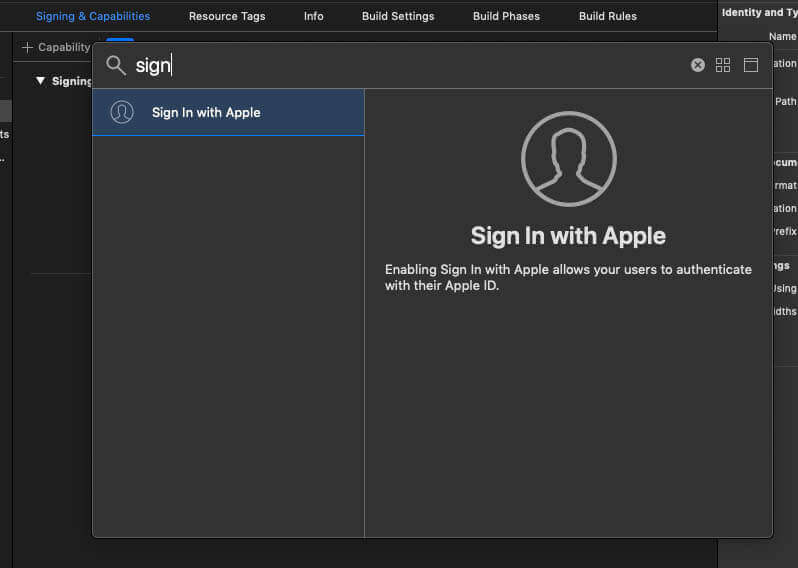
Step 2: Add Sign In with Apple to your app in Xcode
Now it’s time to enable the Sign in With Apple feature in your app through Xcode.
- Open your project settings.
- Go to Signing & Capabilities.
- Click on +Capability and type into the search pane until Sign In with Apple feature appears. Select it.
Step 3: Add the Sign In with Apple button
Create the Sign In with Apple button to appear in your app.
- Import the AuthenticationServices since it’s the framework that provides the Sign In with Apple button view.
- Next, create the button. The steps to do so are straightforward: Set up the button type and the style. In our case, we are using the .signUp type and .white as the style since our background will be dark.
- Finally, set up an action as a UIControl object and add it to any view. In our case, we are adding to a UIStackView.
In code, it looks like this:
import UIKit
import AuthenticationServices

class SignInViewController: UIViewController {

@IBOutlet weak var stackView: UIStackView!

override func viewDidLoad() {
  super.viewDidLoad()

  setupTitleLabel()
  setupLoginWithAppleButton()
}

private func setupLoginWithAppleButton() {
  let signInWithAppleButton = ASAuthorizationAppleIDButton(authorizationButtonType: .signUp, authorizationButtonStyle: .white)
  signInWithAppleButton.addTarget(self, action: #selector(signInWithAppleButtonPressed), for: .touchUpInside)
  stackView.addArrangedSubview(signInWithAppleButton)
}
Step 4: Connect the button to the Sign In with Apple authorization flow
Now that the UI and feature have been created, we need to connect it to Apple’s authorization flow.
- First, create your ASAuthorizationAppleIDProvider and prepare its request with the scopes set to .fullName and .email — if those two options are what you need.
- Next, create your ASAuthorizationController and set the presentationContextProvider and the delegate, where we show what they do in the next listing.
Now just perform the request:
@objc private func signInWithAppleButtonPressed() {
  let authorizationAppleIDProvider = ASAuthorizationAppleIDProvider()
  let authorizationRequest = authorizationAppleIDProvider.createRequest()
  authorizationRequest.requestedScopes = [.fullName, .email]

  let authorizationController = ASAuthorizationController(authorizationRequests: [authorizationRequest])
  authorizationController.presentationContextProvider = self
  authorizationController.delegate = self
  authorizationController.performRequests()
}
Step 5: Set up the Presentation Context Provider
The Presentation Context Provider protocol is necessary so the Sign In with Apple action sheet can be presented on top of your current app. If you have an iOS app, this is straightforward. However, if your app is built for iPadOS, it’s important to provide the right scene. Let’s just assume our current app does not require iPad support. The code is simple:
extension SignInViewController: ASAuthorizationControllerPresentationContextProviding {

  func presentationAnchor(for controller: ASAuthorizationController) -> ASPresentationAnchor {
    return view.window!
  }
}
Step 6: Set up the Authorization Controller Delegate for the user’s response
This is where you will handle the response from the action sheet. There are two possible scenarios to cover success and failure.
If your user has opted-in and granted you permission to access user name and email, authorizationController(controller: ASAuthorizationController, didCompleteWithAuthorization authorization: ASAuthorization) will be called. Otherwise, authorizationController(controller: ASAuthorizationController, didCompleteWithError error: Error)will be called. It’s important to handle both and provide the right information to the user upon completion. For the purpose of this post, let’s focus on the scenario where the user has granted permission to access the following:
- User ID: The unique user ID across all platforms
- Email: A user’s email address, which could either be the official user email or an obscured one
- Full name: If asked, this will be their tokenized full name and can be used to customize your UX
- Authorization Code & Identity Token: These are encrypted data you’ll send to your server. This is optional — it will only be available if this is a new user. Otherwise, you will only receive “User”
It’s important to note that your backend should perform the final authentication of your user. To do that, follow the Oauth2.0 steps, and learn more here.
The code will look like this:
extension SignInViewController: ASAuthorizationControllerDelegate {

  func authorizationController(controller: ASAuthorizationController, didCompleteWithAuthorization authorization: ASAuthorization) {
    guard let appleIDCredential = authorization.credential as? ASAuthorizationAppleIDCredential else { return }

    print("User ID: \(appleIDCredential.user)")

    if let userEmail = appleIDCredential.email {
      print("Email: \(userEmail)")
    }

    if let userGivenName = appleIDCredential.fullName?.givenName,
      let userFamilyName = appleIDCredential.fullName?.familyName {
      print("Given Name: \(userGivenName)")
      print("Family Name: \(userFamilyName)")
    }

    if let authorizationCode = appleIDCredential.authorizationCode,
      let identifyToken = appleIDCredential.identityToken {
      print("Authorization Code: \(authorizationCode)")
      print("Identity Token: \(identifyToken)")
      //First time user, perform authentication with the backend
      //TODO: Submit authorization code and identity token to your backend for user validation and signIn
      return
    }
    //TODO: Perform user login given User ID
  }

  func authorizationController(controller: ASAuthorizationController, didCompleteWithError error: Error) {
    print("Authorization returned an error: \(error.localizedDescription)")
  }
}
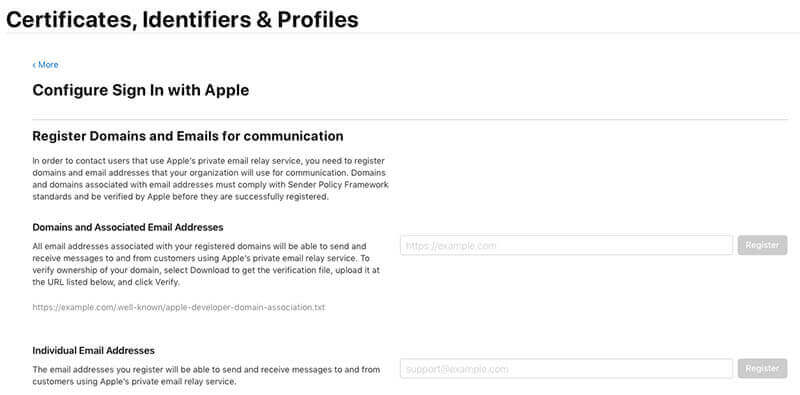
Step 7: White list your email
Sign In with Apple is built around privacy. As I mentioned before, users can hide their personal email from the developer, which means that direct communication to users by email requires you to white list your email domain and originator email. Here are the steps to do so:
- Log in to your Apple developer account.
- Select Certificates, Identifiers & Profiles.
- Select More.
- Select Configure under Sign In with Apple.
- Register your Domain and Emails for communication, as seen in the image below:
Of course, there also still the option to communicate to users through push notifications and other in-app methods.
Step 8: Support Apple’s Keychain sign in
As a developer, you can choose to support Apple’s Keychain login along with Sign In with Apple. To do that, we will have to go back to the button handling in Step 4 and set up an additional authentication provider, called PasswordProvider, and add code as follows:
@objc private func signInWithAppleButtonPressed() {
  let authorizationAppleIDProvider = ASAuthorizationAppleIDProvider()
  let authorizationAppleIDRequest = authorizationAppleIDProvider.createRequest()
  authorizationAppleIDRequest.requestedScopes = [.fullName, .email]

  let authorizationPasswordProvider = ASAuthorizationPasswordProvider()
  let authorizationPasswordRequest = authorizationPasswordProvider.createRequest()

  let authorizationController = ASAuthorizationController(authorizationRequests: [authorizationAppleIDRequest, authorizationPasswordRequest])
  authorizationController.presentationContextProvider = self
  authorizationController.delegate = self
  authorizationController.performRequests()
}
Now, for your delegate function to handle authorization, implement the support for the password provider as follows:
func authorizationController(controller: ASAuthorizationController, didCompleteWithAuthorization authorization: ASAuthorization) {
  switch authorization.credential {
  case let appleIDCredential as ASAuthorizationAppleIDCredential:
    handle(appleIDCredential: appleIDCredential)
  case let passwordCredential as ASPasswordCredential:
    handle(passwordCredential: passwordCredential)
  default: break
  }
}
Handling the password credentials is straightforward. All you have to do is get the username and password and submit to your server for authentication. The code is as follows:
private func handle(passwordCredential: ASPasswordCredential) {
  print("User: \(passwordCredential.user)")
  print("Password: \(passwordCredential.password)")

  //TODO: Fill your email/password fields if you have it and submit credentials securely to your server for authentication
}
Step 9: Check current user status
This step is very important. Users can choose to stop using Apple ID with your app or sign out of their device. There are two ways to handle it: upon opening your app and while your app is active.
First way: Upon opening your app
You should log the user out of your app upon reopening it, in case the user chose to stop using their Apple ID as the SSO provider. To check the current user status, you will have to implement the following function tied to your ASAuthorizationAppleIDProvider. Make note of how each case should be handled in this code:
private func setupAppleIDCredentialObserver() {
  let authorizationAppleIDProvider = ASAuthorizationAppleIDProvider()

  authorizationAppleIDProvider.getCredentialState(forUserID: "currentUserIdentifier") { (credentialState: ASAuthorizationAppleIDProvider.CredentialState, error: Error?) in
    if let error = error {
      print(error)
      // Something went wrong check error state
      return
    }
    switch (credentialState) {
    case .authorized:
      //User is authorized to continue using your app
      break
    case .revoked:
      //User has revoked access to your app
      break
    case .notFound:
      //User is not found, meaning that the user never signed in through Apple ID
      break
    default: break
    }
  }
}
Second way: While your app is running
In order to listen to changes of the user’s Apple ID session, add an observer for CredentialRevoked. Make sure that the object holding the observer does not lose its instance while the app session is live. In code, it looks like this:
private func registerForAppleIDSessionChanges() {
  let notificationCenter = NotificationCenter.default
  let sessionNotificationName = NSNotification.Name.ASAuthorizationAppleIDProviderCredentialRevoked

  appleIDSessionObserver = notificationCenter.addObserver(forName: sessionNotificationName, object: nil, queue: nil) { (notification: Notification) in
    //Sign user out
  }
}
Wrapping up: Next steps to supporting Sign In with Apple
The steps shared in this post should work, with minor adjustments, for iOS/iPadOS devices (iPhone, iPad and iPod touch), the Mac, Apple TV, and Apple Watch. To offer the same functionality for different platforms, Apple offers a JavaScript SDK (the experience is provided through a Webview).
Your next step is to make sure your backend is ready to support Sign In with Apple. Like any new app update and feature, this authorization flow has to be fully tested to make sure that onboarding current users to Sign In with Apple is implemented correctly.
Sign In with Apple is straightforward and native to the platform, and offers a secure, two-factor authentication mechanism for your app. I would highly recommend supporting it for any app that currently uses only email account setup and sign-in.
Is your app ready for iOS 13?
Sign In with Apple provides a smooth onboarding experience that reduces hurdles that impact user-engagement and loyalty for your app. Users will soon expect this feature in all their apps, so don’t get left behind. And if your app already supports other SSO features, you must add support for Sign In with Apple so your app complies with the iOS 13 guidelines.
iOS 13 will launch this September.
If you need help implementing this new feature, we’re happy to share advice on how to support Sign In with Apple — or any of the new iOS 13 features. Set up a free phone consultation with our app experts today.