Follow Us


© Copyright 2026 ArcTouch. All rights reserved.
© Copyright 2026 ArcTouch. All rights reserved.
How do you build an Alexa Skill? ArcTouch Alexa developers share step-by-step instructions how to build a custom Alexa Skill.
5 min. read - March 22, 2022
Get our newsletter in your inbox.
ArcTouch shares 12 best practices that provide a great starting point for building accessible web experiences.
The ArcTouch design and development team shares how to use AI to build lovable apps and websites — better and faster.
We help companies of all sizes build lovable apps, websites, and connected experiences.
At ArcTouch we create lovable apps for clients for a variety of platforms — including voice apps and custom Alexa Skills. I recently built an Alexa Skill for a streaming music service.
In this post, I’ll share step-by-step instructions for how to build an Alexa Skill. These are meant for those just starting out building custom Alexa Skills.
To start, you’re going to need an Amazon Developer Account to access the Alexa Developer Console and run commands on ASK CLI.
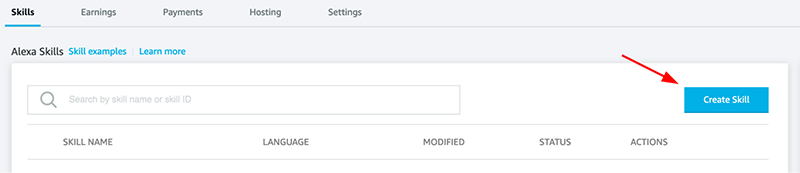
On the Alexa developer console, press the blue “Create Skill” button to build a new Alexa Skill:
Next, you’ll need to choose a Skill name and choose the language(s) the Skill will support.Then, select a model and a hosting option:
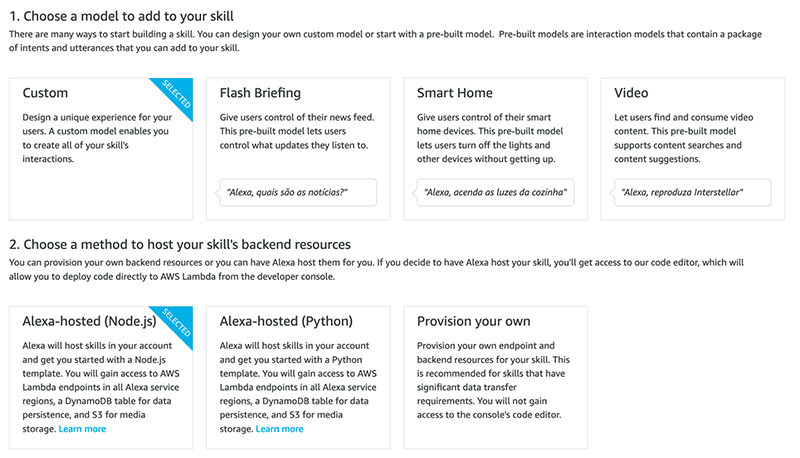
We suggest using a custom model to build an Alexa-hosted Skill. The following instructions show how to build the Alexa Skill in Javascript, so we chose the option with a Node.js template.
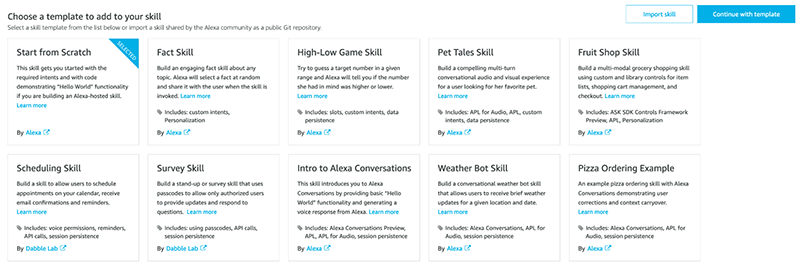
Choose Start from Scratch (but fear not, I’ll help you out):
After the Skill initialization, you’ll land on the dashboard. This is the main screen that provides the front end of your Skill:
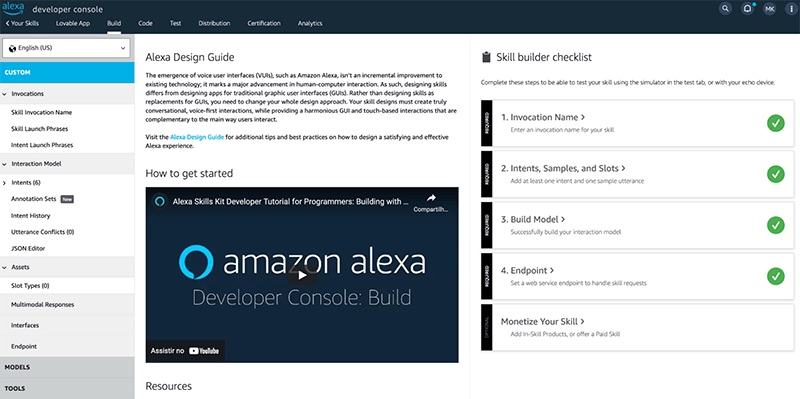
You can customize your Alexa Skill’s invocation name, intents, build models and much more. These are the elements of the voice user interface (VUI). The Alexa developer console includes helpful documentation for each of these, but here’s a summary of the most important ones:
Invocation name: The name required to trigger a custom Skill’s intents. For example: Alexa, ask Daily Horoscopes the horoscope for Gemini. Daily Horoscopes is the invocation name.
Launch phrases: Phrases that don’t require an invocation name to activate the Skill. Ignore these for now since they have several requirements to fulfill.
Intents: Actions that fulfill a user’s spoken request. They can have slots, and they use sample utterances to build up the voice recognition mapping. For example: “Alexa, ask Daily Horoscopes the horoscope for Gemini.” “Ask the horoscope for Gemini” is an utterance that triggers the intent “horoscope” with the slot “Gemini.”
Other VUI options such as slots, multimodal responses, interfaces, endpoint, models and tools are not relevant for this step-by-step guide, but feel free to check them out.
With the basic terms of the VUI explained, let’s set up the intents and utterances of your Alexa Skill.
The real magic in building a great Alexa Skill (and really any great voice app) is defining how spoken words trigger different responses. The programming model for creating Alexa Skills offers quite a bit of flexibility.
Utterances are recognized phrases that may be part of a sentence someone might say. Alexa tries to match a whole sentence a user says with one utterance, and each utterance needs to map to an intent — otherwise an unavailable intent exception is raised. An intent represents what information the user is trying to get from the Skill. For example, a food delivery Skill might have “check menu” and “place order” intents.
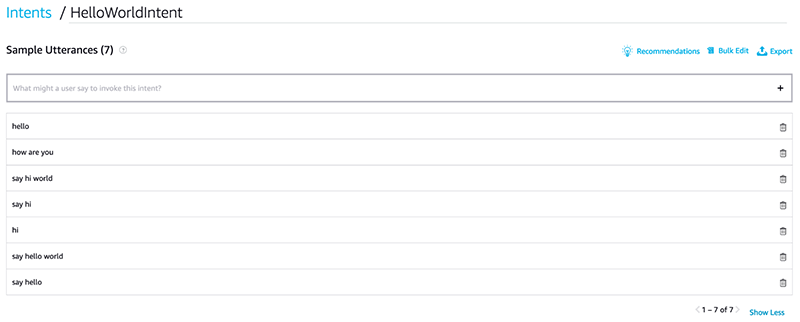
Utterances trigger intents. In our Hello World project generated by the “Start from Scratch” template, “hello” and “say hi world” are utterances that trigger the HelloWorldIntent:
To customize a Skill even further, you might want to use keywords in the sentence, or slot values.
Next, click the “Code” tab on the Alexa Developer Console dashboard to modify the Skill’s code directly from the browser. Note that there should be some code in there already.
The code is designed to have request and intent handlers, which are objects that have a canHandle method to match intents and requests and a function that handles it, processing the information and building a response.
All these handlers are then used in Alexa.SkillBuilders.custom().addRequestHandlers(), which builds the Skill generating a Lambda function. Finally, the resulting output is exported from our file.
While coding on the browser is cool, using a local editor is even cooler – and helps us build the Alexa Skill on the local computer as well.
Install and configure the Amazon Skills Kit Command Line Interface (ASK CLI).
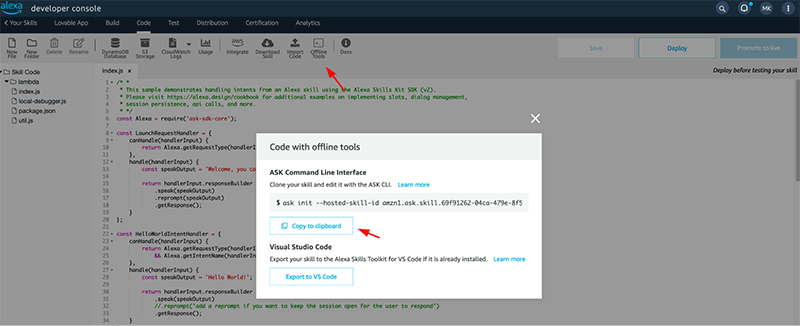
Then, go back to the web editor and click on Offline Tools. Copy the command line and paste it into your command prompt. This will initialize the Alexa Skill locally on your computer:
From now on you’ll have the Lambda folder with a NodeJS package which you can install dependencies and setup scripts as in any other project.
There are several ways available to QA test an Alexa Skill. The simplest one is to deploy the Skill and test it using the test interface on Alexa Developer Console.
You can also test it directly on your Echo devices or the Alexa Mobile App if these are authenticated using the same Amazon Developer account. In the Alexa Mobile app, go to More > Skill & Games > Your Skills > Dev and confirm that your Skill is showing there.
Finally, for debugging an Alexa Skill you can also route all the Skill calls to your computer’s console logs to review while you’re developing it. Just use ask run on a separate terminal and either call the Skill on a device or use ask dialog to write down a speech text command.
When we cloned our Skill code we did so with ask init. This is the simplest solution for a barebones CI/CD pipeline. To deploy changes, just make a git commit and push them to the remote repository. A simple git push origin master after committing your changes will work.
You can also merge your branch into the prod branch and deploy the code directly to the live environment. This is equivalent to clicking Promote to live in the Code tab of the developer console. This action replaces the live code for your published Skill, affecting the live behavior of the Skill.
Beta testing with real users is a very important step when building an Alexa Skill. It allows you to validate how your Skill is performing away from controlled environments such as your emulator and personal devices.
Additionally, I recommend you take the time to review the submission checklist for the Alexa Skill store. This will give you peace of mind that the final Skill certification process will go smoothly.
In order to enable beta testing, go to the Distribution tab of the Developer Console. There you will see on the left-side menu an item called Availability. Activate the Beta Test section, then add the Beta Test Administrator Email Address (your email) and a list of emails addresses for beta tester you’d like to review the Alexa Skill. Click on Enable beta testing and your testers should be notified through email with the next steps to enable the Skill.
You are almost there! If your beta testers have tested your Skill and you’re happy with its performance, then it’s time to submit the Skill for certification. Amazon will run automated and manual tests on your Skill based on the submission checklist and confirm that the public listing information is appropriate. This process can take from a couple of hours to a full week, depending on the complexity of your Skill.
Go to the Developer Console for the Alexa Skill you built and open the Certification tab. Under the left side menu, click Validation and run the test. You shouldn’t face any issues, but if you do, go ahead and fix them. It’s a requirement. Once validation is complete, go to the Submission item. Add a version message for you to keep track of what was changed (this is not public-facing) and click Submit for review.
That’s it! Amazon will email you when the certification is approved.
Once approved, your Skill will be added to the public Alexa Skills store on Amazon’s website. This can take a few hours. Don’t worry if it’s not there immediately. Congratulations!
Amazon’s tools for building an Alexa Skill are so intuitive and fast that creating simple voice apps is now easier than ever.
As a next step, start exploring the different features of the Alexa Skills Node.js SDK and start creating more complex conversations. Add different types of slots and experiment with them.
Need additional help from our experienced Alexa Skill engineers or want your own voice app for your brand or business? Contact us and let’s have a conversation.
