---
title: Using Azure Custom Vision for .NET MAUI apps | ArcTouch
description: Step-by-step instructions how to use Azure Custom Vision and add AI image classification to .NET MAUI or Xamarin apps.
url: "https://arctouch.com/blog/azure-custom-vision"
date_modified: "2025-10-27T20:44:11.192Z"
---
# How to use Azure Custom Vision and add AI to your .NET MAUI app
Step-by-step instructions how to use Azure Custom Vision and add AI image classification to .NET MAUI or Xamarin apps.
5 min. read - November 10, 2022
By Nilo Basilio
[](mailto:?subject=Interesting%20blog%20post&body=I%20thought%20you%20might%20like%20this%20blog%20post%20from%20ArcTouch%3A%20https%3A%2F%2Farctouch.com%2Fblog%2Fazure-custom-vision)

Artificial Intelligence (AI) can help developers create unique user experiences by analyzing and predicting outcomes from large data sources. However, for many developers, learning the basic data science skills needed to apply AI and machine learning to custom applications is challenging. Fortunately, Microsoft offers [Azure Cognitive Services](https://azure.microsoft.com/en-us/services/cognitive-services/). It provides ready-made AI services to build intelligent apps. [Azure Custom Vision](https://azure.microsoft.com/en-us/services/cognitive-services/custom-vision-service/), one of the services, makes it easy to work with image classification, a common use-case in AI applications.
This article provides step-by-step instructions on how to use Azure Custom Vision with [.NET MAUI](/tag/net-maui) to add machine learning to a mobile app.
## What is Custom Vision?
Custom Vision uses AI to analyze an image and apply labels according to the visual characteristics. Each label represents a classification. Azure Custom Vision makes it easy for developers to create a custom image classification model and train the AI to use it.
Here are a few ways that image classification could be used in mobile apps:
* **Manufacturing**. A quality control inspector could take pictures of manufactured parts to see if they are defective.
* **Education**. Zoo visitors could learn more about animals, using images they take via a mobile app.
* **Medicine**. Machine learning solutions could help doctors evaluate images from X-rays, identifying abnormalities as they differ from other similar images.
One example: The [Flavor Maker app](/portfolio/mccormick), which ArcTouch built with McCormick, uses image classification to help customers create a digital spice rack as they scan bottles with their phones.
## Step-by-step: How to use Azure Custom Vision
Let’s build a project using Azure Custom Vision and .NET MAUI. In this example, we’ll create an app for a zoo that provides information about the animals as visitors take pictures of them. The first part covers how to create and train a new Custom Vision model, and the second part integrates this model into a .NET MAUI app via the API.
### 1\. Create a new Azure Custom Vision project
Azure Custom Vision makes it easy to create and train machine learning models. First, navigate to the [Custom Vision portal](https://www.customvision.ai/) and sign in. If you don’t have an Azure subscription, create a free account before you begin.
To use the Custom Vision Service, we need to create both Training and Prediction resources, which could be done inside the _Create new project_ dialog box.
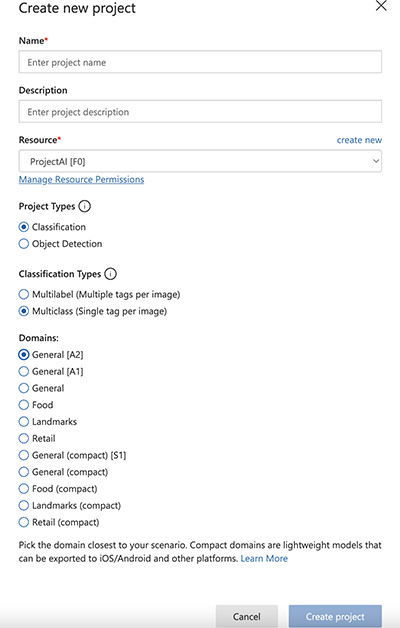
Enter a name and a description for the project. Then select a Resource Group or create a new one. Choose _Multiclass_ for _Classification Types_, so we will have one tag per image.
Select a domain. Each domain optimizes the model for specific types of images, as follows:
* General: Classifier optimized for different areas of knowledge, for generic use.
* Food: Classifier optimized for images that represent food, similar to restaurant menus.
* Landmarks: Classifier optimized to identify landmarks in landscapes and cities, such as the Statue of Liberty in New York.
* Retail: Classifier optimized for retail images from shopping catalogs. It helps in predicting images that represent products.
Finally, select _Create project_.
## 2\. Add images to the Custom Vision project
For this example, we will use images of big cats, like lions, tigers, and jaguars. We’ll upload and tag images to help train the classifier. To train your model effectively, use images with visual variety. Note that the Custom Vision API supports images up to 4 MB.
Select the _Add images_ button.
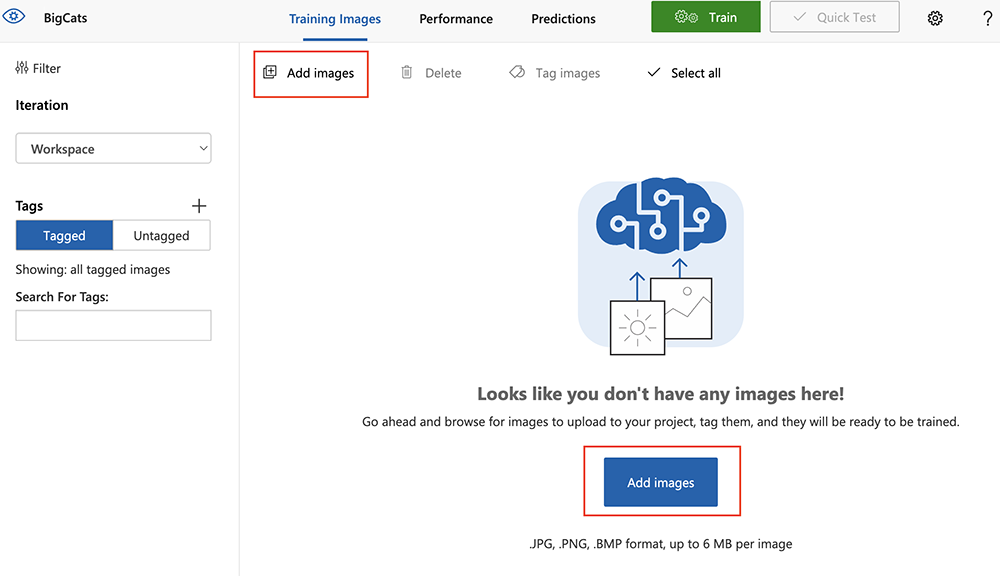
Next, upload the images by groups. For example, upload all lions and in the _My Tags_ label add the tag “lion” to apply to this entire group. Repeat this process again for the tigers and again for the jaguars. This helps the model understand what each type of big cat looks like.If you make a mistake, you can go through and change the tags for individual images. You can also use negative tags to filter content not related to any other tags, such as other animals like cats, foxes, birds, etc.
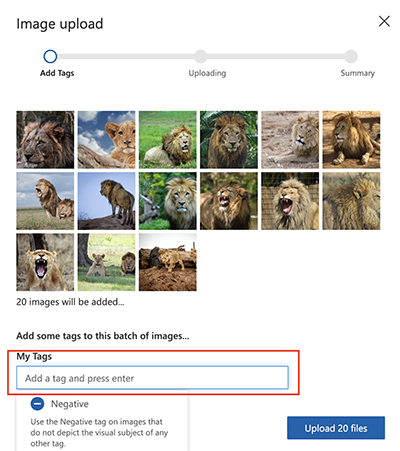
Select _Done_ to complete. To upload another set of images, repeat the steps above.
## 3\. Train your Custom Vision ML model
Choose _Train_ to review all the images uploaded to create a model that identifies the visual qualities of each tag. This process should take a few minutes. Information about the training process is displayed in the _Performance_ tab. You can keep uploading images and re-train the model to create different iterations.
Once the training is complete, the model’s performance is estimated and displayed. The Custom Vision service uses the images uploaded for training to calculate precision and recall metrics.
* **Precision**: Indicates how likely the model is to correctly predict a new image.
* **Recall**: Indicates the model’s recall ability to correctly classify the images.
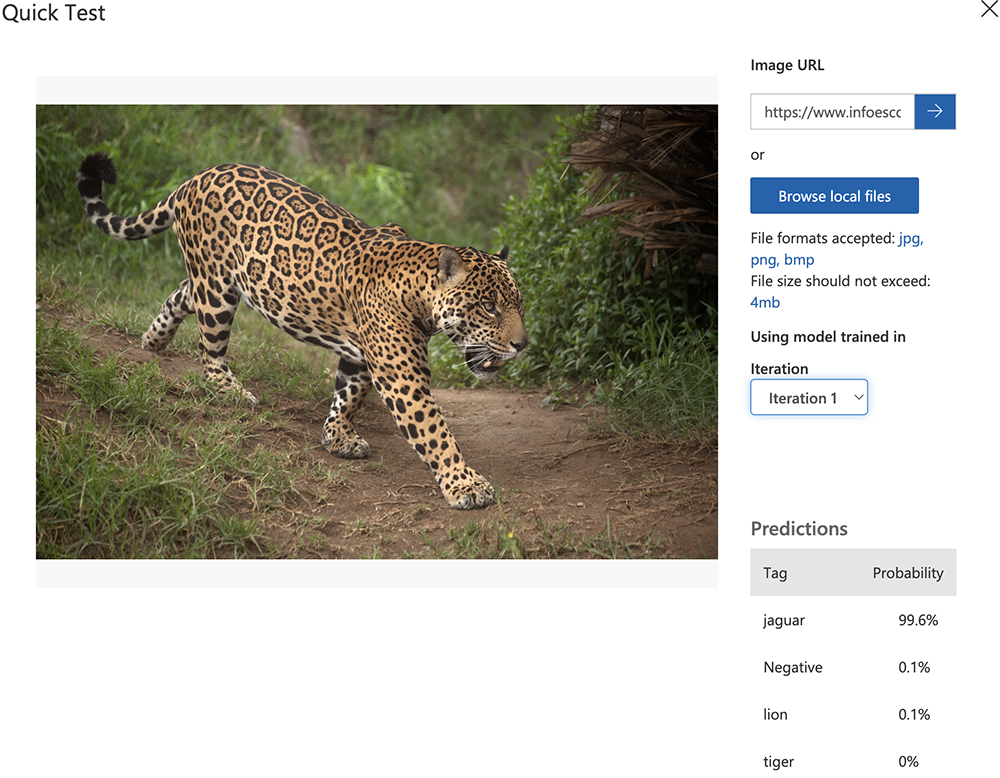
We can test the model using _Quick Test_ to submit an image or URL. In this example, you can see that the model correctly identifies a jaguar with over 99% probability.
## 4\. Publish the model to the Custom Vision API
Now we publish the AI model so the .NET MAUI app can access it via the Custom Vision API. Click _Publish_ on the _Performance_ tab, enter a name for this model iteration, and choose the Prediction resource we created earlier.
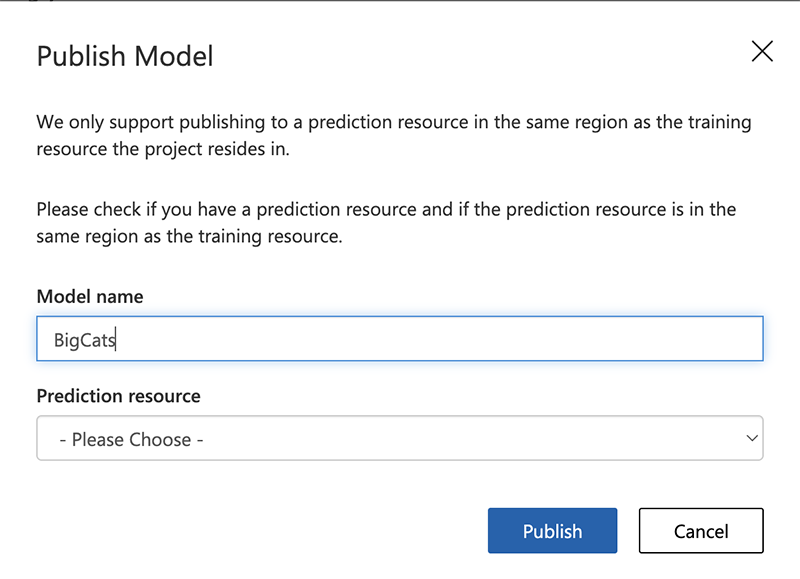
You can also export the model for offline use in your application. It’s possible to export the model to CoreML, TensorFlow, or ONNX. These models can be loaded into iOS, Android, or UWP respectively.
## 5\. Create the .NET MAUI app
Now it’s time to create the .NET MAUI app to use the custom vision model. The following information applies to both .NET MAUI and Xamarin.Forms projects. This is a simple app that allows choosing a picture from the gallery or taking a new photo and sending it to the Custom Vision API for identification.
### Add libraries
Once you’ve created a new project, [install this NuGet package](https://www.nuget.org/packages/Microsoft.Azure.CognitiveServices.Vision.CustomVision.Prediction/) to work with Custom Vision.
We need to work with the camera, so also add [Media Picker](https://docs.microsoft.com/en-us/dotnet/maui/platform-integration/device-media/picker?tabs=android) for MAUI or [Xam Plugin](https://github.com/jamesmontemagno/MediaPlugin) for Xamarin.Forms. The implementation is pretty similar for both plugins. You may also want to use some helpful tools from Community Toolkits ([XCT](https://docs.microsoft.com/en-us/xamarin/community-toolkit/) and/or [MVVM](https://docs.microsoft.com/en-us/dotnet/communitytoolkit/mvvm/)).
### Create a static class
Start by creating a static class `ApiKeys`. This will have variables for our resources key and endpoint. You can find this information on the Azure portal resources and in Custom Vision project settings. The `PublishedName` is the same name we gave to our model when publishing the iteration.
1
2
3
4
5
6
7
```
public static class ApiKeys
{
public static string CustomVisionEndPoint => "";
public static string PredictionKey => "";
public static string ProjectId => "";
public static string PublishedName => "BigCats";
}
```
In this small sample, use the MVVM pattern. Add a few controls to `MainPage.xaml` (such as labels, images, and buttons) and make the bindings through `MainPageViewModel.cs`.
1
2
3
4
5
6
7
8
9
10
11
12
13
14
15
16
17
18
19
20
21
22
23
24
25
26
27
28
29
30
31
32
33
34
35
36
37
```
```
In the `MainPageViewModel.cs` set the commands for `PickPhotoCommand` and `TakePhotoCommand`, and also update the values for `Photo` and `OutputLabel`. Use the `ProcessPhotoAsync` method to get the information from the button click and set the camera plugin correctly. Use the `ClassifyImage` method to call the Custom Vision API and display the results on the screen — the type of big cat.
1
2
3
4
5
6
7
8
9
10
11
12
13
14
15
16
17
18
19
20
21
22
23
24
25
26
27
28
29
30
31
32
33
34
35
36
37
38
39
40
41
42
43
```
private const int ImageMaxSizeBytes = 4194304;
private const int ImageMaxResolution = 1024;
public MainPageViewModel()
{
PickPhotoCommand = new AsyncRelayCommand(ExecutePickPhoto);
TakePhotoCommand = new AsyncRelayCommand(ExecuteTakePhoto);
}
(...)
public ICommand PickPhotoCommand { get; }
public ICommand TakePhotoCommand { get; }
private Task ExecutePickPhoto() => ProcessPhotoAsync(false);
private Task ExecuteTakePhoto() => ProcessPhotoAsync(true);
private async Task ProcessPhotoAsync(bool useCamera)
{
var photo = useCamera
? await MediaPicker.Default.CapturePhotoAsync()
: await MediaPicker.Default.PickPhotoAsync();
if (photo is { })
{
// Resize to allowed size - 4MB
var resizedPhoto = await ResizePhotoStream(photo);
// Custom Vision API call
var result = await ClassifyImage(new MemoryStream(resizedPhoto));
// Change the percentage notation from 0.9 to display 90.0%
var percent = result.Probability.ToString("P1");
Photo = ImageSource.FromStream(() => new MemoryStream(resizedPhoto));
OutputLabel = result.TagName.Equals("Negative")
? "This is not a big cat."
: $"It looks {percent} a {result.TagName}.";
}
}
```
A quick note about the `ResizePhotoStream` method: It is required for the MAUI sample because the Media Picker plugin does not yet offer any settings to resize the image file. Remember that the Custom Vision Prediction API supports files up to 4 MB.
1
2
3
4
5
6
7
8
9
10
11
12
13
14
15
16
17
18
19
20
21
22
23
24
25
26
```
private async Task ResizePhotoStream(FileResult photo)
{
byte[] result = null;
using (var stream = await photo.OpenReadAsync())
{
if (stream.Length > ImageMaxSizeBytes)
{
var image = PlatformImage.FromStream(stream);
if (image != null)
{
var newImage = image.Downsize(ImageMaxResolution, true);
result = newImage.AsBytes();
}
}
else
{
using (var binaryReader = new BinaryReader(stream))
{
result = binaryReader.ReadBytes((int)stream.Length);
}
}
}
return result;
}
```
The `ClassifyImage` is an async method that we’re using to create our endpoint via `CustomVisionPredictionClient` class. Note the `ApiKeys` static class usage there. We can send photos as a stream to the Custom Vision Service and get the model prediction results, ordering them by highest probability and returning the first one, which will be displayed on the screen.
1
2
3
4
5
6
7
8
9
10
11
12
13
14
15
16
17
18
19
20
21
22
23
24
25
26
27
```
private async Task ClassifyImage (Stream photoStream)
{
try
{
IsRunning = true;
var endpoint = new CustomVisionPredictionClient(new ApiKeyServiceClientCredentials(ApiKeys.PredictionKey))
{
Endpoint = ApiKeys.CustomVisionEndPoint
};
// Send image to the Custom Vision API
var results = await endpoint.ClassifyImageAsync(Guid.Parse(ApiKeys.ProjectId), ApiKeys.PublishedName, photoStream);
// Return the most likely prediction
return results.Predictions?.OrderByDescending(x => x.Probability).FirstOrDefault();
}
catch (Exception ex)
{
Debug.WriteLine(ex.Message);
return new PredictionModel();
}
finally
{
IsRunning = false;
}
}
```
Here’s the sample .NET MAUI app working with Azure Custom Vision:
## Want to learn more about Azure Custom Vision?
Azure Cognitive Services makes it easy to leverage AI and machine learning in your apps. Azure Custom Vision simplifies image classification for developers and helps them to customize a new model in a few steps and integrate it with an app via REST API. Check out [Microsoft’s Custom Vision services documentation](https://docs.microsoft.com/en-us/azure/cognitive-services/custom-vision-service/) to learn more.
If you’d like to discuss how to apply machine learning to your .NET MAUI or Xamarin.Forms app, [contact us](/contact) to set up a free consultation with our app experts.
## Article Author:
[NB | Nilo Basilio | ArcTouch employee](/blog/author/nilo-basilio)
## Tags:
[.NET MAUI](/tag/net-maui) [Azure](/tag/azure) [Best Practices](/tag/best-practices) [Developer Tips](/tag/developer-tips) [Machine Learning](/tag/machine-learning)
## Subscribe for more insights
Get our newsletter in your inbox.
## Related posts
[12 web accessibility best practices: A starter list | ArcTouch shares 12 best practices that provide a great starting point for building accessible web experiences. | 5 min. read - April 16, 2024](/blog/web-accessibility-best-practices) [Injecting AI into software development — an ArcTouch blog series | The ArcTouch design and development team shares how to use AI to build lovable apps and websites — better and faster. | 5 min. read - April 9, 2024](/blog/ai-software-development)
## Contact us.
### Let's build something lovable. Together.
We help companies of all sizes build lovable apps, websites, and connected experiences.